
Locking Down SSH - The Right Way
A little guide for locking down a VPS or similar to ensure your SSH connection is as secure as can be.


A little guide for locking down a VPS or similar to ensure your SSH connection is as secure as can be. Now this is nothing new but a few tips and tricks I've learned recently that have enabled me to better secure my servers and hosts.
I am going to focus on a few basics to get us started:
- Enabling key based authentication and generating secure keys!
- Enabling Multi Factor Authentication (MFA)
- Enabling Rate-Limiting and Firewalling
- Obscuring Your Setup
- Login Notifications via Telegram and Slack.
Key Based Authentication
Key-based SSH authentication is the de facto standard today when building new machines in the cloud, and one of the key things I have learned is creating strong keys and enforcing/locking down your configuration can go a long way to help provide a more safe feeling about putting a host out there on the internet. Creation of an SSH key in a secure manner is very simple to do however before we go ahead and make some first check if you already have any:
for key in ~/.ssh/*; do ssh-keygen -l -f "${key}"; done | uniq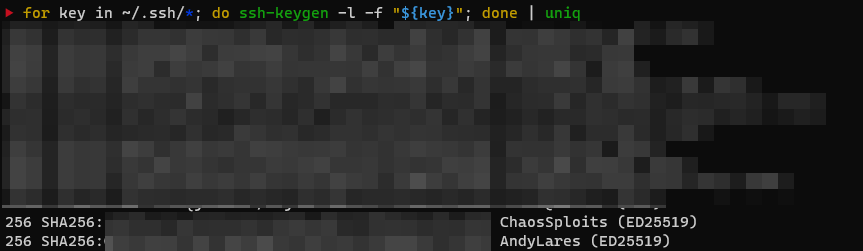
To quickly break down the above command for those wondering it does essentially goes through the different keys within ~/.ssh/ and shows the fingerprint of specified public key file. If you want the full ins and outs of the command check out this explain shell link.
If this returns any of the following algorithms, it's probably worth upgrading or re-generating new keys, it's not to say that you need to destroy your others but consider something a bit stronger.
- DSA: It’s unsafe and no longer supported since OpenSSH version 7, therefore follow the steps below to upgrade to a stronger key.
- RSA: It depends on key size. If it has 3072 or 4096-bit length, then no problem however if it is anything else upgrading to a stronger key is recommended.
- ECDSA: This depends on how good your machine is at generating random numbers,
- Ed25519: It’s the most recommended public-key algorithm available today!
In order to generate an ED25519 key, the following command can be used:
ssh-keygen -t ed25519 -a 112 -f ~/.ssh/id_ed25519 -C "Insert a Comment Here"The command is broken down as follows:
-t: Specifies the type of key to create, in this case Ed25519, however by default I believessh-keygengenerates an RSA key on standard Ubuntu and Debian.-a: It’s the numbers of Key Derivation Function(KDF) rounds. Higher numbers result in slower passphrase verification, increasing the resistance to brute-force password cracking should the private-key be stolen. I chose 112 as a random number but this can be anything.-f: Specify the filename of the generated key file. To use it by default with ssh it must be located within.sshin your home directory, otherwise it can be specified by using the-iflag when ssh-ing into a server:ssh -i /path/to/id_ed25519 user@host.-C: An option to specify a comment. It’s purely informational and can be anything. But it’s usually filled withInsert a Comment Herewho generated the key. This will be the comment when your key is added to a machine'sauthorized_keysfile.
Once we've generated a key, the next step is to ensure the SSH config has SSH key based authentication enabled and password based authentication disabled. To do this, edit the SSH config file (aye I know vim vs nano... use whatever editor you want, my pref is nano).
sudo nano /etc/ssh/sshd_configThere are two options we want to uncomment in the config:
PasswordAuthentication no
PubkeyAuthentication yes
By default, Ubuntu server will have PubkeyAuthentication set to yes, however to be doubly sure enabling it and disabling Password authentication is the best option. Other settings in this config can be changed to increase the verbosity of logging too however we are not going to do this in this section.
Finally once the settings are changed, we need to add our key to the authorized_keys file, by adding our public key:
cat ~/.ssh/id_ed25519.pub >> ~/.ssh/authorized_keysThis will echo our PUBLIC key into the authorized keys file enabling us to SSH in. Make sure you test you can SSH into your machine before exiting the session as you may need to play about with settings and don't want to lock yourself out!
Once you are happy everything is configured and keys are in the correct place, restart the SSH service:
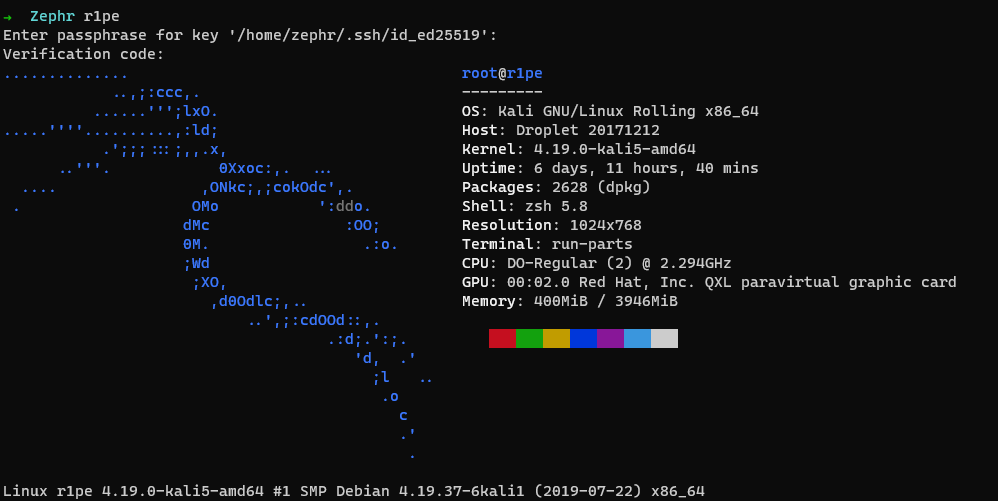
sudo systemctl reload sshd.serviceNext once we have keys configured it's time to lock down access even more with MFA, rate-limiting and some obscurities. A quick test to see we're prompted for password then authenticated (you'll notice authentication prompts me for a password and then a second verification code, this is MFA in action ;) )
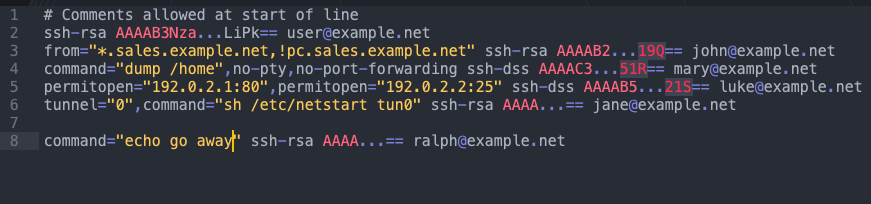
Hardening Authorized Keys
Thanks to Florian Roth for pointing out that authorized keys can be further hardened with command restrictions and shell restrictions, therefore if you have specific users you want to restrict access to specifics such as commands and forwarding. Screenshot courtesy of Florian's tweet:
Multi Factor Authentication
For enabling MFA on SSH there are a few options that can be configured, I opted to use google authenticator but there are other options out there too. The setup for this is fairly straight forward and requires a little playing about.
First thing is first, update and upgrade the OS to latest version (assuming a debian/ubuntu base here);
sudo apt update
sudo apt upgrade -y
Once the system is all updated next is to install the Google Authenticator PAM module, there is a lot that can be done with this module however the primary install I'm going to focus on is MFA for authentication to SSH:
apt install libpam-google-authenticatorOnce the PAM app is installed you will need to use a helper app that comes with the PAM to generate a Time-Based One-Time Password (TOTP) {not top of the pops as I originally thought it stood for!} key for the user you want to add a second factor to. This key is generated on a per user basis, and as a result is not system-wide.
This means every user that wants to use a TOTP auth app will need to log in and run the helper app to get their own key; you can’t just run it once to enable it for everyone. To do this simply run:
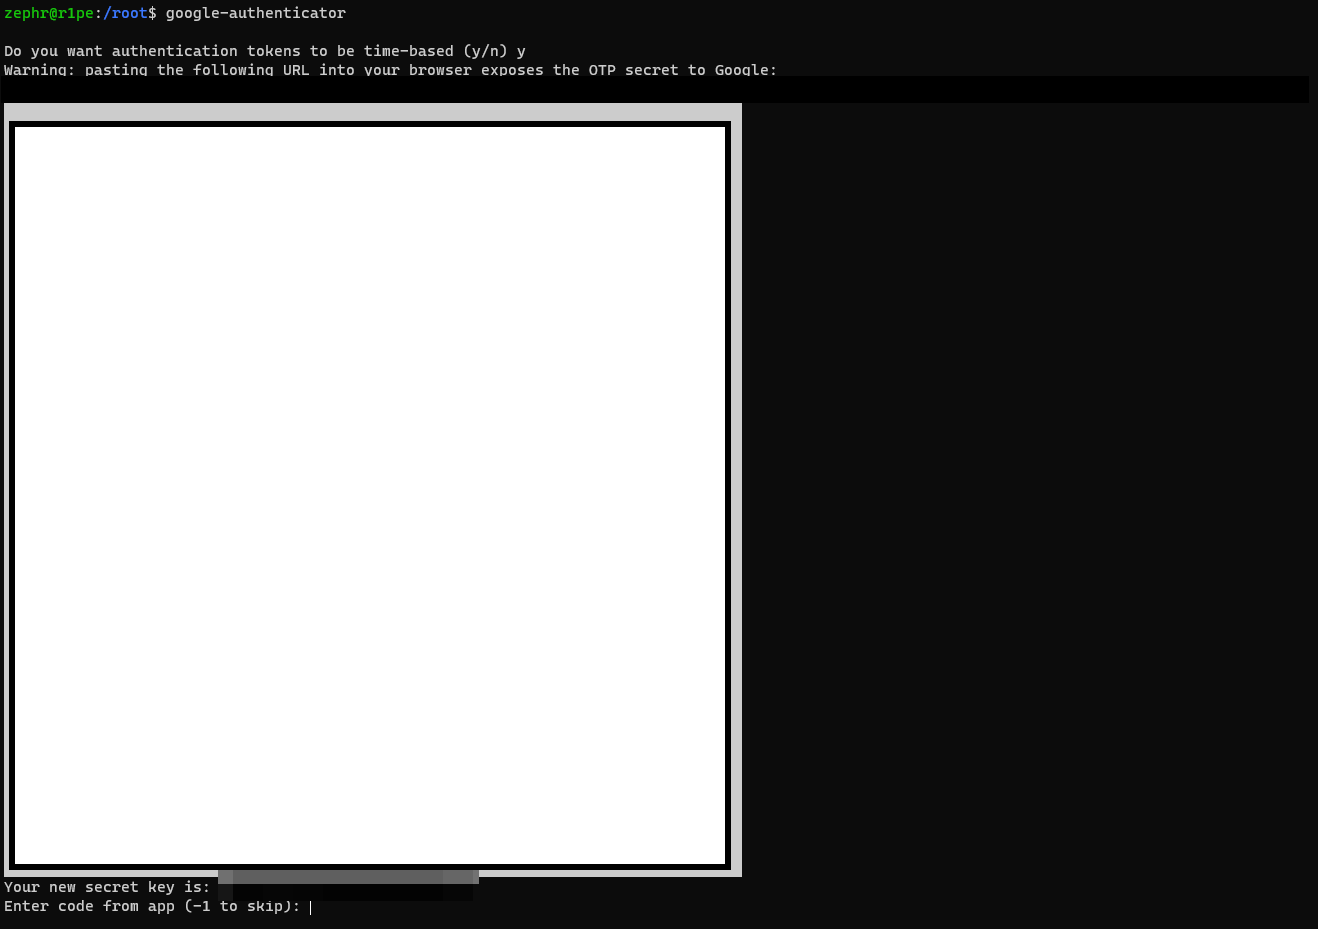
google-authenticatorUpon running the command, you’ll be asked a few questions. The first one asks if authentication tokens should be time-based. We want to select y:
Do you want authentication tokens to be time-based (y/n) yOnce we select yes, the app will generate a QR code that can be scanned within your authenticator app of choice, I used google authenticator as I have it for other sites and servers too. This PAM allows for time-based or sequential-based tokens. Using sequential-based tokens mean the code starts at a certain point and then increments the code after every use. Using time-based tokens mean the code changes randomly after a certain time elapses (usually 60s). We’ll stick with time-based because that is what apps like Google Authenticator anticipate, so answer y for yes.
Once you scan the QR code your app will generate a TOTP that you can enter to the CLI and it'll prompt you to save emergency codes, like other MFA keep these for a break glass moment if your OTP app isn't available as a manual override.
The remaining questions inform the PAM how to function. We’ll go through them one by one.
Do you want me to update your "/home/zephr/.google_authenticator" file? (y/n)This writes the key and options to the .google_authenticator file. If you select no, then the program will quit and nothing is saved which in turn results in the authenticator application not working. Therefore we want to select yes for this!
By default, tokens are good for 30 seconds and in order to compensate for
possible time-skew between the client and the server, we allow an extra
token before and after the current time. If you experience problems with poor
time synchronization, you can increase the window from its default
size of 1:30min to about 4min. Do you want to do so (y/n) n
Selecting yes for this question enables up to 8 valid codes in a moving four minute window. By answering no, you limit it to 3 valid codes in a 90 second rolling window. Unless you find issues with the 90 second window, answering no is the more secure choice.
If the computer that you are logging into isn't hardened against brute-force
login attempts, you can enable rate-limiting for the authentication module.
By default, this limits attackers to no more than 3 login attempts every 30s.
Do you want to enable rate-limiting (y/n) y
Rate limiting means a remote attacker can only attempt a certain number of guesses before being blocked. If you haven’t previously configured rate limiting directly into SSH then this is prime time to configure it, we will look at configuring UFW in more depth in the next section.
Once you finish this setup, if you want to back up your secret key, you can copy the ~/.google-authenticator file to a trusted location. From there, you can deploy it on additional systems or redeploy it after a backup, it does mean sharing the same TOTP code between multiple systems which isn't as secure as separate codes!
Once we've been through the steps to configure google authenticator, the next step is to setup our SSH config to allow authenticator to function:
sudo nano /etc/pam.d/sshdAdd the following line to the bottom of the file.
# Standard Un*x password updating.
@include common-password
auth required pam_google_authenticator.so nullok
Your config might look similar to that shown below:
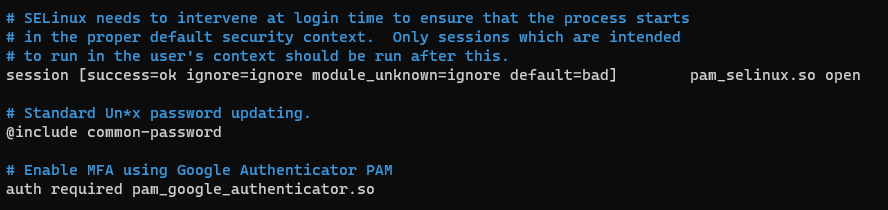
The nullok word at the end of the last line tells the PAM that this authentication method is optional. This allows users without a OATH-TOTP token to still log in using their SSH key. Once all users have an OATH-TOTP token, you can remove nullok from this line to make MFA mandatory.
Next, we’ll configure SSH to support this kind of authentication. Open the SSH configuration file for editing.
sudo nano /etc/ssh/sshd_configLook for ChallengeResponseAuthentication and set its value to yes. We are also going to make SSH aware of MFA by adding AuthenticationMethods and UsePAM:
# To disable tunneled clear text passwords, change to no here!
PasswordAuthentication no
#PermitEmptyPasswords no

# Change to yes to enable challenge-response passwords (beware issues with
# some PAM modules and threads)
ChallengeResponseAuthentication yes
UsePAM yes
AuthenticationMethods publickey,password publickey,keyboard-interactive
In addition look for the line @include common-auth and comment it out by adding a # character as the first character on the line. This tells PAM not to prompt for a password.
Save the config and restart the SSH service.
sudo systemctl reload sshd.serviceThen test again if you're able to authenticate it should now prompt you for your SSH key password and a verification code:

Once verification is setup you have completed stage two of securing your server, by having two factors (an SSH key + MFA token) across two channels (your computer + your phone), you’ve made it very difficult for an attacker to brute force their way into your machine via SSH and greatly increased the security of your machine.
Rate-Limiting and Firewalling
Now we've done some authentication hardening, next up is limiting attempts at authentication to our server, this can also be done in multiple ways, the first is probably the most straight forward and uses Uncomplicated Firewall(UFW).
This is the most simple setup of all the things discussed so far as it can be done in two commands(if you don't have it installed):
sudo apt install ufw

## ufw limit ssh various usage ##
ufw limit ssh comment 'Rate limit for openssh server'

### if sshd is running on tcp port 2022 add ####
ufw limit 2022/tcp comment 'SSH port rate limit'
The above rules are useful for protecting against brute-force login attacks. When a limit rule is used, ufw will normally allow the connection but will deny connections if an IP address attempts to initiate six or more connections within thirty seconds. ufw supports per rule logging. By default, no logging is performed when a packet matches a rule.
Specifying log will log all new connections matching the rule, and log-all will log all packets matching the rule. For example, to allow and log all new ssh connections, use:
ufw limit log ssh comment 'Rate limit for SSH'Using UFW will allow you to lock down services to specific IP addresses if you wanted to go one further:
sudo ufw allow from 1.2.3.4 to any port 22This will allow only 1.2.3.4 to SSH to port 22, when you do a port scan of the host the port will show as closed or filtered.
Setting up Fail2Ban
With UFW alone, a setup is pretty good as it uses IP Tables under the hood however taking detection and response a little further we can setup Fail2Ban. Fail2Ban essentially actively looks out for signs of potential password authentication abuses to filter out IP addresses and regularly update the system firewall to suspend these IP addresses for a certain period.
To setup fail2ban all you need to do is install it and enable it:
sudo apt install fail2ban
sudo cp /etc/fail2ban/jail.{conf,local}
sudo nano /etc/fail2ban/jail.local
Edit the following lines to tweak the setup:
bantime = 1dYou can also make permanent bans by assigning a negative value.
Another very important variable is findtime. It defines the time-duration allowed between consecutive login attempts. If the multiple login attempts were made within the time defined by findtime, a ban would be set on the IP.
findtime = 10mLastly, there’s maxretry. It defines the exact number of failed login attempts allowed within the findtime. If the number of failed-authorization attempts within the findtime exceeds the maxretry value, the IP would be banned from logging back in. The default value is 5.
maxretry = 5Fail2ban also allows you to grant immunity to IP addresses and IP ranges of your choice. These conditions discussed above won’t be applied to these IPs, essentially letting you create sort of an allow list.
To add an IP to this allowlist, modify the ignoreip line and type in the IP address to exempt, ideally you want your home IP in here or a machine you access the host from frequently to save you locking yourself out!
ignoreip = 127.0.0.1/8 ::1 222.222.222.222 192.168.55.0/24
Upon setting all the options you want, simply start the service then check the status:
systemctl start fail2ban
systemctl status fail2ban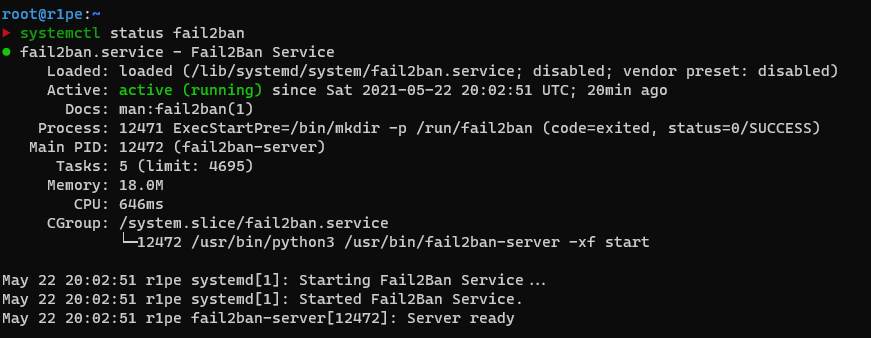
Obscuring Your Setup
Now with Keys, MFA and rate limiting enabled we can secure our setup further via security through obscurity. The most common change that folks make is to move the SSH port away from port 22 to lower the brute-force and auto-scanning attacks, combined with good firewalling it is possible to make a host invisible to port scans(however I won't be covering this in this post).
Moving SSH Port
Moving the SSH port is as easy as a quick configuration change in /etc/ssh/sshd_config:
sudo nano /etc/ssh/sshd_configSimply uncomment the Port and change this to whatever port you want then save the file and restart the service:
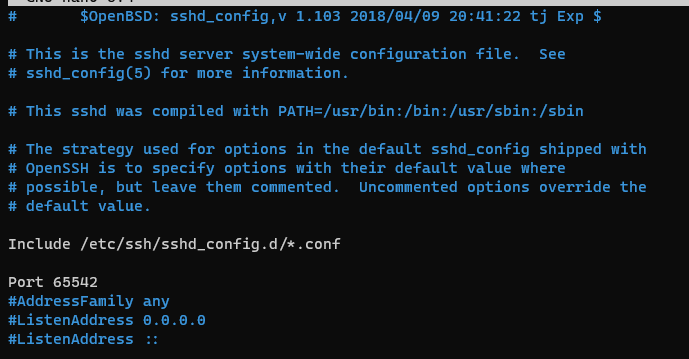
Once all saved, you can ssh into your server with the new port:
ssh -p 65532 [email protected] -vSingle Packet Authorisation
SPA is something I hadn't heard of before up until Tim asked me if I was covering it in this post:
Looking at SPA at all?
— 🀄 Some guy called Tim Wilkes 🀄 (@TimmehWimmy) May 13, 2021
SPA is similar to port knocking it is essentially a method of externally opening ports on a firewall by generating a connection attempt on a set of prespecified closed ports. It's nothing new but it is another method of obscuring your setup to protect it from prying eyes.
Port knocking is an older first gen technology that uses the port fields within TCP and UDP packet headers to communicate information. Typically, these protocols are used to encapsulate application layer data, however port knocking encodes information in sequences of packets to various ports by using the port numbers themselves as fields to transmit data.
An example port knocking scenario is for a port knocking server to configure a packet filter to block all access to a service, such as SSH, until a specific port knock sequence is sent by a port knocking client. For example, the server could require the client to send TCP SYN packets to the following ports in order:
- 23400
- 1001
- 2003
- 65501
If the server monitors this knock sequence, the packet filter reconfigures to allow an SSH connection from the IP address that sent it. By making use of a connection tracking mechanism provided by the packet filter, an SSH session can remain established after the initial rule created by the knock server is removed after a timeout. This adds extra security through obscurity, where this differs slightly from SPA is that SPA is considered newer and it retains all of the benefits of port knocking, but fixes the limitations incurred from older technology.
To set this up we're going to install fwknop which stands for FireWall KNock OPerator. To install and setup fwknop we need to install the client and server on the respective hosts:
Server side:
sudo apt install fwknop-server

Client Side:
sudo apt install fwknop-client
First we need to setup the ports to auto drop SSH, I used this guide to setup fwknop in full. So the steps below are like for like copied from the guide:
Configure UFW to allow UDP port 62201 as it is the default, this can be changed in the configuration file:
ufw allow 62201/udp comment 'SPA Setup for Port Knocking'Configure iptables as follows:
  iptables -I INPUT 1 -i eth0 -p tcp --dport 22 -j DROP
  iptables -I INPUT 1 -i eth0 -p tcp -m conntrack --ctstate ESTABLISHED,RELATED -j ACCEPT
Then we'll setup the keys on the client first after installing fwknop-client:
- Use
fwknop -K keys.txtto gen the key and HMAC_key for your SPA
fwknop -K keys.tx
cat keys.txt

OUT:
KEY_BASE64: example
HMAC_KEY_BASE64: example
Edit ~/.fwknoprc to include the details of your server and the keys generated above:
[bastion]
SPA_SERVER          <Target IP>
ACCESS              tcp/22
KEY_BASE64          <BASE64>
HMAC_KEY_BASE64     <BASE64>
USE_HMAC            Y
Next up we need to copy the same key data to our server under /etc/fwknop/access.conf:
#### fwknopd access.conf stanzas ###

SOURCE              ANY
KEY_BASE64: example
HMAC_KEY_BASE64: example
Once all the data is copied to both client and server, check the status of the server by running:
 systemctl start fwknop-server
 systemctl status fwknop-server
Once the service is running you should be able to run the following command from your host machine to open the port:
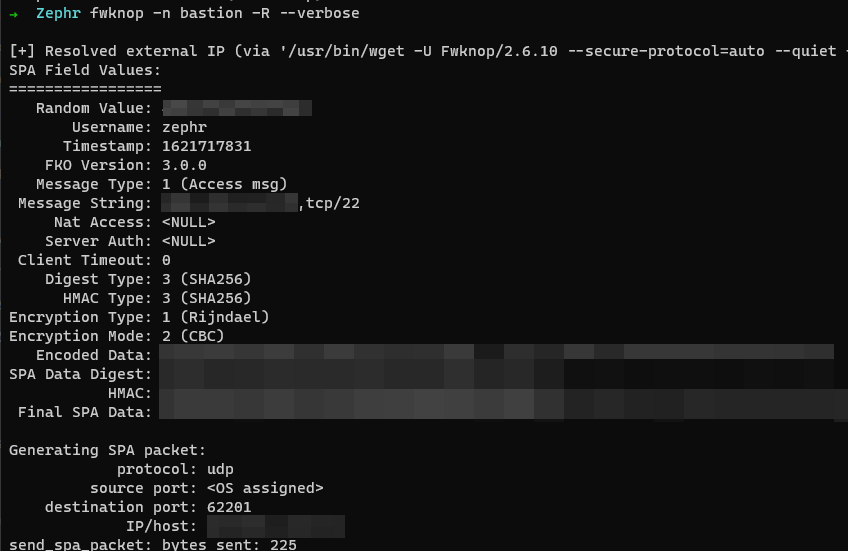
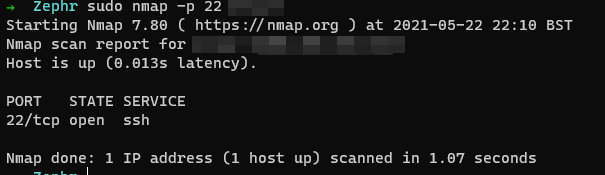
fwknop -n bastion -R --verboseAll going well it should look a little something like the screenshots below, an initial nmap shows the port as closed, then running the command opens the port:
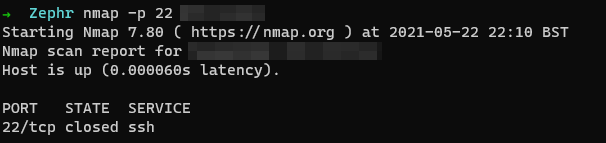
Execution of bastion command:
Execute nmap scan after command:
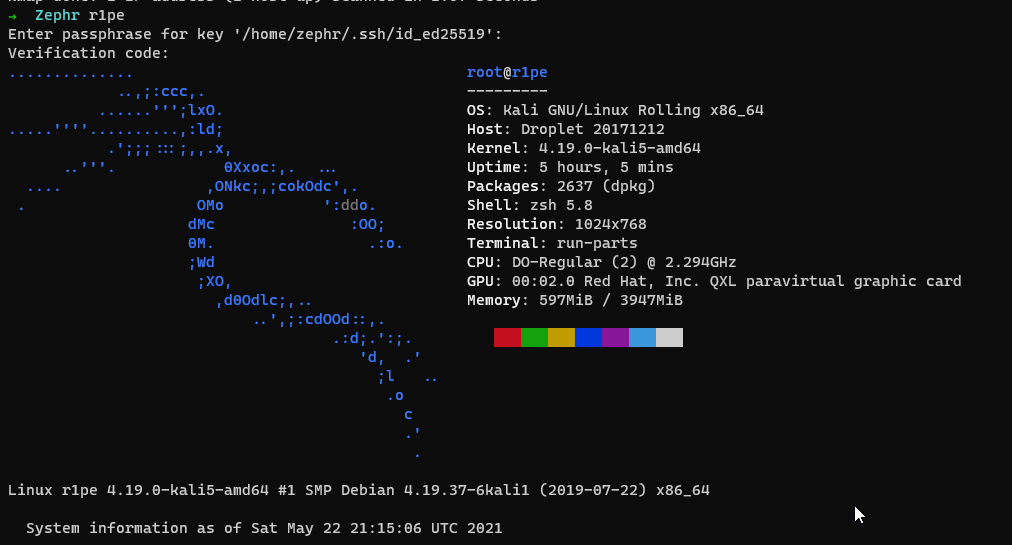
I'm not going to pretend to understand how that works but as we can see, magic! Open port and able to ssh in:
To make life easier we can also alias up the command to make it easy to remember in our .bashrc or .zshrc or whatever shell you use:
alias fwknock="fwknop -n bastion -R --verbose"Tada! SPA all setup and our port is hidden from plain view, if you want to further harden the setup you could consider changing both the SSH port and the port knocking port.
Notifications of Logins
Last but not least, we've gone through the motions of hardening our setup but what good is hardening it if we have no monitoring in place to tell us when someone authenticates? Enter the beauty of login notifications, this is something I setup a while ago after setting up notifications for PoshC2 and Cobalt Strike, SSH was a logical next step.
I'm going to explain how to do this with two different platforms, this is do-able realistically on any platform that supports webhooks as it is a few tweaks in your profile file and some web requests.
Telegram Bots
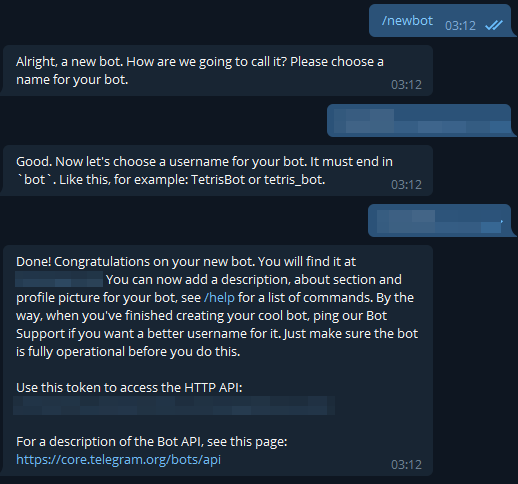
Telegram's bot API is very good for doing all manner of things, the easiest thing to do is to build your bot first, you can do this by sending a message to BotFather:
/newbotThis will instruct the bot to create a new bot, it'll prompt you for a name that must end in bot, once you've supplied it with a name it'll create you a new bot ID and an API token.
The next step is to setup a group where you want your alerts to go and add yourself, the bot you just created and IDbot.
IDBot will give you the CHATID you can do this by sending a message into the channel /getgroupid it'll return the group ID for the channel, simply prepend a hyphen to the number and that's the chatID: -123456789 as an example. Grab this plus the http API key and add them to the following script.
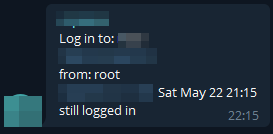
# Login Notifications
CHATID=CHANGEME
BOTKEY=CHANGEME

# get hostname
HOSTNM=$( hostname )

# get external IP address
IP=$( curl -s http://whatismyip.akamai.com/ )

# find IP address of person last logged in
LOGININFO=$( last -1 -i | head -n 1)

# parse into nice format
LOGININFO1=$( python3 -c "login='$LOGININFO'.split('   '); del login[1]; del login[1]; print(''.join([x.strip(' ') + '   \n' for x in login]));" )

# send information to telegram notification bot
curl -X POST -H 'Content-Type: application/json' -d "{\"chat_id\": \"$CHATID\", \"text\": \"Log in to: $HOSTNM\n$IP\nfrom: $LOGININFO1\", \"disable_notification\": false}" https://api.telegram.org/bot$BOTKEY/sendMessage --silent > /dev/null
This can then either be bundled into a bash script and called from your profile or written straight into the profile:
ZSH
nano /etc/zsh/zprofile
BASH
nano /etc/profile
Then once this is saved, each time you SSH into your host and spawn a shell you'll get an alert into the group you setup:
Slack Bots
When it comes to setting up slack, the process for setting up a webhook is documented on Slack's site. Follow the steps to setup a webhook then you should have a URL that looks something like this:
https://hooks.slack.com/services/VALUE1/VALUE2With the help of Slack's documentation, I've written a python script similar to the bash one above but instead of sending to Telegram it sends to slack.
from slack_sdk.webhook import WebhookClient
import os
url = " https://hooks.slack.com/services/VALUE1/VALUE2"
webhook = WebhookClient(url)
HOSTNM = os.popen('hostname').read()
IP = os.popen('curl -s http://whatismyip.akamai.com/').read()
LOGININFO=os.popen('last -1 -i | head -n 1 | cut -d " " -f 1').read()
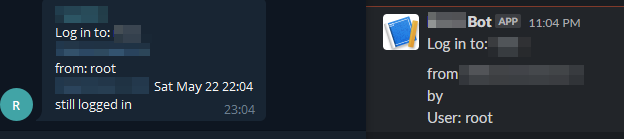
response = webhook.send(text='Log in to: {}\n from {}\n by\n User: {} \n'.format(HOSTNM,IP,LOGININFO))
assert response.status_code == 200
assert response.body == "ok"As per the slack documentation you'll need to install the slack SDK:
pip install slack_sdkSave this as whatever you want .py and reference it from your profile file similar to the telegram script:
python3 /etc/zsh/down.py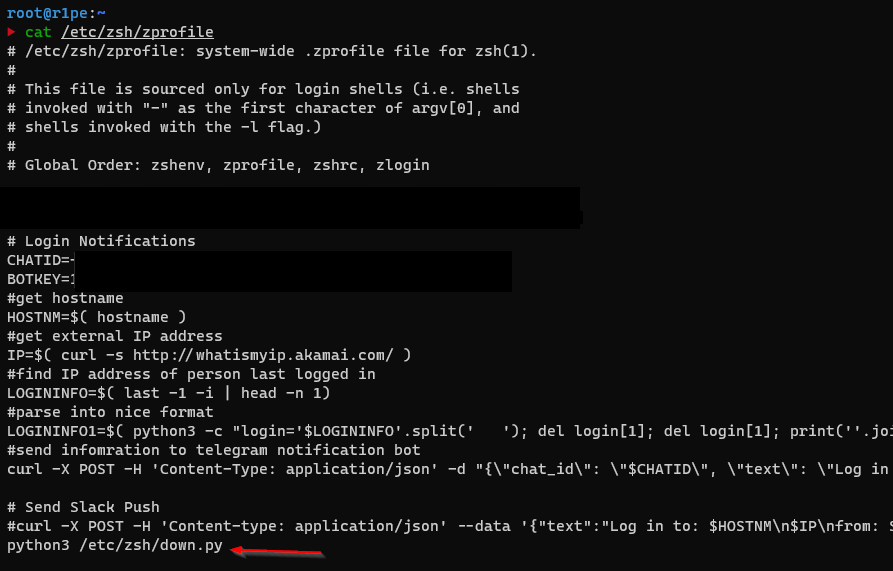
Finally, when you authenticate to your server you'll get a push notification to whatever platform:
There we go all setup and done!
Quick recap, we've successfully setup:
- Secure Keys
- MFA
- Firewalling
- Obscured our setup
- Login Notifications
