
Understanding Cobalt Strike Profiles - Updated for Cobalt Strike 4.6
A deep dive into specifics around cobalt strike malleable c2 profiles and key information that is new in cobalt strike 4.6


I aim to keep this blog post updated as the new versions of Cobalt Strike come out and explain the different options available within Malleable Profiles.
I really enjoy the process of red teaming especially when it comes to evading detection and lining up against a good blue team. Probably one of the most common commercially available Command and Control(C2) frameworks used today is Cobalt Strike(CS). So popular in fact it is classified on its own as a malware family by many defensive security products.
Using CS in red team operations is common practice for a lot of companies offering red teaming to their clients and my mileage is no different there. Having used many products I've found the ability to craft how the C2 responds to traffic very useful, which is where malleable c2 profiles enter the conversation.
One of the great and popular features of cobalt strike is the ability to create profiles to shape and mask traffic, essentially a profile is used to tell the CS teamserver how traffic is going to look and how to respond to the data the beacon sends it.
Example Profile
The output below is an example profile broken down into the different sections and much like the documentation explains, I am going to break down what each section does and how it works both from a profile specific perspective and in use case scenarios.
In addition I will explain what different sections can be used for to help blue team and purple team folks alike understand how it works and how to develop detections.
Auxiliary Information
set sample_name "Zsec Example Profile";
set host_stage "false";
set jitter "0";
set pipename "msagent_###"; # Each # is replaced witha random hex value.
set pipename_stager "status_##";
set sleeptime "60000"; # default sleep in ms, 1 minute
set ssh_banner "Cobalt Strike 4.4";
set ssh_pipename "postex_ssh_####";
set data_jitter "100";
set useragent "Not Cobalt Strike";
The initial section is where the auxiliary information is set such as sleep times, user agent, named pipes and banners. The different options above are broken down as follows:
- sample_name: This is the name of the profile, it enables for easy management of multiple profiles. This information is also used in the reporting output from CS within the indicators of compromise report.
- host_stage: This value sets if the server will have a stager or not, the common practice for opersational security is to set this to false and use stageless payloads with the tradeoff that shellcode produced is much bigger due to it containing everything.
- jitter: This is the percetage of jitter on the sleep time of the beacon, it defaults to 0 but can be set to any %. Meaning if for example 10% is set and the sleep time was 60s the beacon sleep would be anything from 54-66s of sleep.
- pipeame: This sets the default name used for any named pipes, typically when writing profiles it is best practice to enumerate pipes of software in the environment and tweak the profile to match. A common example is to mirror Google Chrome named pipes which start
mojo_. Named pipe beacons are typically used over the SMB protocol and for hosts that cannot communicate directly to the internet, rather communicate back to a primary beacon that has a direct outbound connection. - sleeptime: This is the check in time or sleep timer of the beacon in miliseconds, the default is typically 60000 aka a minute, but this can be set to anything and combined with the jitter option to solidify a stealthy breach. Blue/Purple tip, it is possible to work out the time deltas on beacons if a process is checking back to a certain domain or list of domains over a period of time, there are various tools that will extract information about the beacon from the running processes.
- ssh_banner: This sets the banner shown on SSH beacons, typically for opsec this should be set to a Linux banner such as
OpenSSH_7.4 Debian (protocol 2.0)or a service to match the traffic being sent. - ssh_pipename: Similar to the pipename parameter, this is the name of the pipe used for SSH based beacons.
- data_jitter: This will enable the operator to append a random length of null data up to the amount set to both get and post responses from the CS server.
- useragent: This sets the User-Agent string used in HTTP requests by the beacon in CS versions < 4.2 there is a 128 max characters limit whereas in CS 4.2+ the max is increased to 255 characters. Typically this value will be set to a user browser or if the profile is set to match a specific piece of software it might mirror that software user agent.
HTTP Config
In addition to the auxiliary information at the top of the profile, the http-config section specifies additional aux information related to specifics applicable to all aspects of the profile. Such as headers to be sent in requests, whether X-Forwarded-For is to be trusted or not and if specific user agents are to be blocked or allowed. The http-config block has influence over all HTTP responses served by Cobalt Strike’s web server.
http-config {
    set headers "Date, Server, Content-Length, Keep-Alive, Connection, Content-Type";
    header "Server" "Apache";
    header "Keep-Alive" "timeout=10, max=100";
    header "Connection" "Keep-Alive";
    set trust_x_forwarded_for "true";
    set block_useragents "curl*,lynx*,wget*";
    set allow_useragents "*Mozilla*";
}- set headers - Does what it says on the tin, specifies specific headers to be set throughout the profile and interactions with beacon and server.
- trust_x_forwarded_for - Use this option if your teamserver is behind a redirector, which from an opsec perspective should ALWAYS be the case if using as an external C2!
- block_useragents - This acts as a block list of user agents that will be met with a 404 page, when browsing to the redirector and passing through to the C2. This can be useful for blocking known crawlers and sandboxes ;).
- allow_useragents - The inverse of the above option, this can be used as an allow list for specific user agents to be permitted to connect to the C2 server.
TLS Certificate
When using a HTTPS listener, CS gives the option for using signed HTTPS certificates for C2 communications. There are multiple options when setting this up ranging from none to signed by trusted authority all of which are described below:
https-certificate {
	# Option 1: Create a signed certificate with Java Keystore tool
	set keystore "/pathtokeystore";
    set password "password";

    # Option 2: Self Signed with vendor specifics
    set C   "US";
    set CN  "jquery.com";
    set O   "jQuery";
    set OU  "Certificate Authority";
    set validity "365";

}
HTTPSC2DoneRight will enable you to create a signed TLS certificate that can be used with CS to improve legitmacy.
- Option 1 above shows a method for making a signed certificate and creating a Java Keystore file and a password for the keystore. This keystore must contain your certificate's private key, the root certificate, any intermediate certificates, and the domain certificate provided by your SSL certificate vendor. CS expects to find the Java Keystore file in the same folder as your Malleable C2 profile.
- Option 2: Is to create a self-signed certificate with whatever information you want, typically this is done to spoof an existing certificate to match the profile, the C, CN, I, OU and validity are all set from typical information supplied in a TLS certificate.
Client and Server Interactions
The most customisable aspect of the profile is being able to specify which sections act in different ways, the main ones are GET and POST specifying how traffic is intercepted and how data is chunked. An example GET and POST section are shown below complete with both client and server interactions.
http-get {
    set uri "/web /api/gallery /updates /about";

    client {
        header "Accept" "*/*";
        header "Connection" "Close";
        header "Host" "zsec.uk";

        metadata {
            base64;
            netbios;
            prepend "cf=";
            header "Cookie";
        }
    }

    server {
        output {

            print;
        }
    }
}
The main sections of the profile are broken up into uri, client, server and the contents held within each. Breaking the above section down:
- set uri: Specifies the URI that the beacon will call back to, this is chosen at random from the list at the time of generation of the beacon, initially one would assume these are round robin but unforunately not. Each beacon variant will have one URI hard coded for both post and get, which is good news for defenders attempting to identify traffic in netflow data.
- The client section details the information sent and shown by the beacon on the target host, this dictates how traffic is chunked and sent and it also specifies how information is encoded, there are multiple options available for this. In addition the profile enables you to set specific headers which is especially important if a specific site or endpoint is being emulated as this will show in the HTTP traffic. It also specifies what the expected host header is on traffic, this enables differentiating between false HTTP traffic and legitimate C2 traffic.
- The metadata section specifiies where things such as cookies can be set, this is an additional place where data can be hidden on C2 communications, typically data is sent in either a specific header or a cookie value which can be specified and set to anything. When red teaming a client it is often common practice to profile users' browsers and expected traffic in an environment to enable better blending in. When CS's Beacon "phones home" it sends metadata about itself to the CS teamserver.
- The server section details how the server responds to C2 traffic, the example above tells the server to respond with raw data in its encrypted form however this can be customised in the same way as the client specifying key areas where things should be encoded.
There are a few options available when it comes to data encoding and transformation. For example, you may choose to netbios encode the data to transmit, prepend some information, and then base64 encode the whole package.

- base64 - Base64 encode data that is encapsulated in various sections, in the exable above the cookie value
cf_contains encoded metadata to be sent back to the CS server. - base64url - URL-safe Base64 Encode, this is typically used when sending data back in a URL parameter and the data needs to be URL safe so as to not break the communcation stream.
- mask - XOR mask w/ random key, this encodes and encrypts the data within a XOR stream with a random key, typically used in combination with other encoding to obfuscate the data stream.
- netbios - NetBIOS Encode 'a' it encodes as netbios data in lower case.
- netbiosu - NetBIOS Encode 'A', another form of netbios encoding.
POST Section
http-post {
    set uri "/web/auth.php /admin/login.php";

    client {
        header "Accept" "*/*";
        header "Host" "zsec.uk";
        header "Connection" "Close";

        id {
            netbios;
            base64url;
            parameter "key";
        }

        output {
            print;
        }
    }

    server {
        header "Pragma" "no-cache";
        header "Connection" "close";

        output {
            print;
        }
    }
}
Again like the GET section above, the POST section states how information should be sent in a POST request, it has the added benefit that specifics such as body content and other parameters can be set to enable you to blend in.
Post Exploitation
Customising the GET and POST requests is just the beginning, the next few sections of the profile is where the magic of post exploitation customisation lives including how the beacon looks in memory, how migration and beacon object files affect the indicators of compromise and much much more.
post-ex {

    set spawnto_x86 "%windir%\\syswow64\\dllhost.exe";
    set spawnto_x64 "%windir%\\sysnative\\dllhost.exe";
    set obfuscate "true";
    set smartinject "true";
    set amsi_disable "true";
    set pipename "Winsock2\\CatalogChangeListener-###-0,";
    set keylogger "GetAsyncKeyState";
    set threadhint "module!function+0x##"
}- spawnto_x86|spawnto_x64 - Specifies the process that will be hollowed out and new beacon process be created inside, this can typically be set to anything however it is recommended not to use the following "csrss.exe","logoff.exe","rdpinit.exe","bootim.exe","smss.exe","userinit.exe","sppsvc.exe". In addition selecting a binary that does not launch with user account control is key(UAC). To add additional stealthy and blending techniques, you can add paramters to the spawnto command:
set spawnto_x86 "%windir%\syswow64\dllhost.exe-k netsvcs"; - obfuscate - The obfuscate option scrambles the content of the post-exploitation DLLs and settles the post-ex capability into memory in a more operational security-safe manner.
- smartinject - This directs Beacon to embed key function pointers, like GetProcAddress and LoadLibrary, into its same-architecture post-ex DLLs. This allows post-ex DLLs to bootstrap themselves in a new process without shellcode-like behavior that is detected and mitigated by watching memory accesses to the PEB and kernel32.dll.
- amsi_disable - This option directs powerpick, execute-assembly, and psinject to patch the AmsiScanBuffer function before loading .NET or PowerShell code. This limits the Antimalware Scan Interface visibility into these capabilities. There are additional things that can be done post exploitation with the likes of beacon object files(BOFS) to evade amsi, but I will not be covering BOFs in this post.
- keylogger - The GetAsyncKeyState option (default) uses the GetAsyncKeyState API to observe keystrokes. The SetWindowsHookEx option uses SetWindowsHookEx to observe keystrokes, this can be tuned even more within the TeamServer properties which is discussed further down this post.
- Threadhint - allows multi-threaded post-ex DLLs to spawn threads with a spoofed start address. Specify the thread hint as "module!function+0x##" to specify the start address to spoof. The optional 0x## part is an offset added to the start address.
Additionally as set in the auxiliary information, the named pipe can be configured for spawning off of new processes under pipename.
Moar Customisation
Now post exploitation is cool and all but how about tuning the ways in which process injection and memory indicators behave? Starting with process injection this is defined with the process-inject { header:
process-inject {
    set allocator "NtMapViewOfSection";

    set min_alloc "17500";

    set startrwx "false";
    set userwx   "false";

    transform-x86 {
        prepend "\x90\x90";
        #append "\x90\x90";
    }

    transform-x64 {
        prepend "\x90\x90";
        #append "\x90\x90";
    }

     execute {

        CreateThread "ntdll!RtlUserThreadStart+0x42";
        CreateThread;

        NtQueueApcThread-s;

        CreateRemoteThread;

        RtlCreateUserThread;
    }
}
The various sections are defined as follows:
- set allocator - Allows setting a remote memory allocation using one of two techniques: VirtualAllocEx or NtMapViewOfSection
- min_alloc - Minimium memory allocation size when injecting content, very useful when it comes to being specific.
- startrwx|userwx - This defaults to false as it sets the memory permissions as initial= read write execute, final= read and execute.
- transform-x86| transform-x64 - Transform injected content to avoid signature detection of first few bytes. Only supports prepend and append of hex based bytes.
The execute section controls the methods that the Beacon will use when it needs to inject code into a process. Beacon examines each option in the execute block, determines if the option is usable for the current context, tries the method when it is usable, and moves on to the next option if code execution did not happen.
- CreateThread - current process only aka self injection
- CreateRemoteThread - Vanilla cross process injection technique. Doesn't cross session boundaries
- NtQueueApcThread|NtQueAPCThread-s - This is the "Early Bird"injection technique. Suspended processes (e.g., post-ex jobs) only.
- RtlCreateUserThread- Risky on XP-era targets;uses RWX shellcode for x86->x64 injection.
- SetThreadContext - Suspended processes (e.g. post-ex jobs only)
Memory Indicators
Finally this block in Malleable C2 profiles controls how Beacon is loaded into memory and edit the contents of the Beacon Reflective DLL. There are a large amount of options to customise this and as a result the possibilities of how a beacon looks in memory are endless!
stage {
    set userwx         	"false";
    set stomppe        	"true";
    set obfuscate      	"true";
    set name           	"srv.dll";
    set cleanup        	"true";

    # Values captured using peclone against a Windows 10 version of explorer.exe
    set checksum        "0";
    set compile_time    "11 Nov 2016 04:08:32";
    set entry_point     "650688";
	set image_size_x86  "4661248";
	set image_size_x64  "4661248";
	set rich_header     "\x3e\x98\xfe\x75\x7a\xf9\x90\x26\x7a\xf9\x90\x26\x7a\xf9\x90\x26\x73\x81\x03\x26\xfc\xf9\x90";

    # transform the x64 rDLL stage
    transform-x64 {
        strrep 			"This program cannot be run in DOS mode" "";
        strrep 			"beacon.dll" "";
        strrep 			"beacon.x64.dll" "";
        strrep 			"beacon.x32.dll" "";
    }

        # transform the x86 rDLL stage
    transform-x86 {
        strrep 			"ReflectiveLoader" "run";
        strrep 			"This program cannot be run in DOS mode" "";
        strrep 			"beacon.dll" "";
        strrep 			"beacon.x64.dll" "";
        strrep 			"beacon.x32.dll" "";
    }
- stomppe - Ask ReflectiveLoader to stomp MZ, PE, and e_lfanew values after it loads Beacon payload
- name - The Exported name of the Beacon DLL
- cleanup - Ask Beacon to attempt to free memory associated with the Reflective DLL package that initialized it.
- checksum - This defaults to zero however it is the CheckSum value in Beacon's PE header.
- compile_time - sets the time that the PE was compiled, note all of the information can be cloned from a legitmate binary using the peclone tool built into cobalt strike.
- entry_point - The EntryPoint value in Beacon's PE header
- image_size_x86 | image_size_x64 - SizeOfImage value in Beacon's PE header
- rich_header - Meta-information inserted by the compiler
- transform-x86 | transform-x64 - The transform-x86 and transform-x64 blocks pad and transform Beacon's Reflective DLL stage. These blocks support three commands: prepend, append, and strrep.
Profile Variants
By default a profile only contains one block of GET and POST however it is possible to pack variations of the current profile by specifying variant blocks. An example variant is shown below:
http-get "GET Azure" {
	client {
		parameter "api" "AZ_example";
        header "Cookie" "SomeValue";
	}
Each variant can have a different name which is later specified when specifying the listener, the screenshot below explains how a listener is defined(borrowed from https://blog.cobaltstrike.com/2019/12/05/cobalt-strike-4-0-bring-your-own-weaponization/).
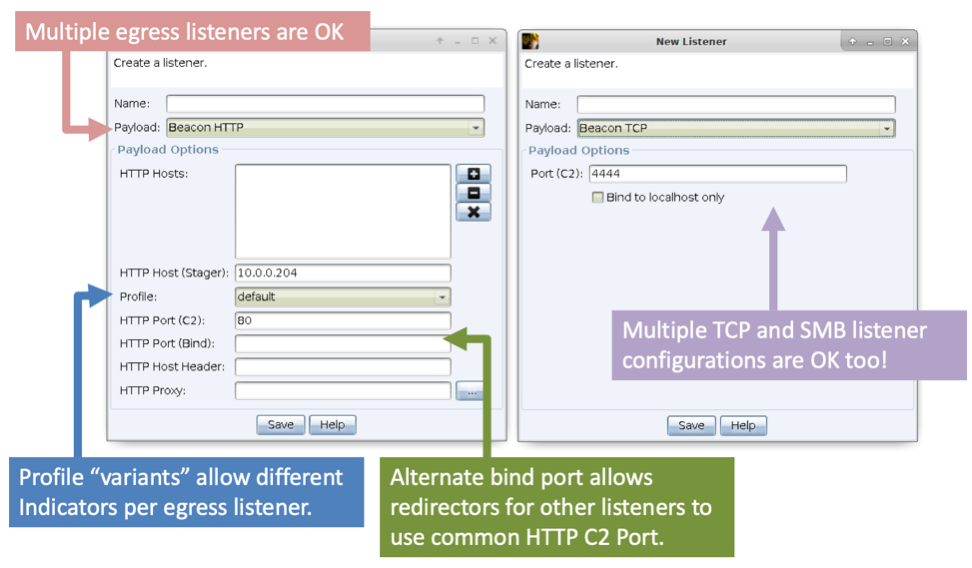
Variants are selectable when configuring an HTTP or HTTPS Beacon listener. Variants allow each HTTP or HTTPS Beacon listener tied to a single team server to have network IOCs that differ from each other.
Difference between GET-ONLY and normal Profiles
I came across the difference recently when it comes to GET vs POST profiles, there are a few blog posts that covered it but skipped over this part and it left me scratching my head on quite a few occasions. Essentially it is in the name, a GET only profile, funnily enough only uses GET requests to communicate with the server.

In terms of malleable c2 profile for GET-only the options that differ from a standard profile is that the HTTP Verb in the http-post section needs to be set to set verb "GET" as shown below. However the output also needs to be set to base64url and given a parameter to be sent in the URL. There are a few limitations of doing this as unless you are using a shortened URL/URI for your callback host, you are limited to 2,083 characters in a URL which minus the URL gives us on average 2000 chars to play with on each request.
http-post {

    set uri "/Search/";
    set verb "GET"; # Option required for GET-Only

    client {

        output {
            base64url; # Option required for GET-Only
            parameter "q";
        }


        id {
            base64url; # Option required for GET-Only
            parameter "form";
        }
    }

    server {

        header "Cache-Control" "private, max-age=0";
        header "Content-Type" "text/html; charset=utf-8";
        header "Vary" "Accept-Encoding";
        header "Server" "Microsoft-IIS/8.5";
        header "Connection" "close";


        output {
            netbios;
            print;
        }
    }
}
The HTTP-POST section serves as the beacon’s response to commands issued by the server and can actually be performed as a HTTP GET or HTTP POST request. In this case for a get-only profile the http verb is set to GET.
New Features in Cobalt Strike 4.4 & 4.5
With all tooling things get updated, so the features below were introduced in CS 4.4 which both improve the profile and operating experience for operators. A few of the newer features that introduce additional options in the CS profile are:
- Sleep Mask Kit - Since CS 3.x there has been an option within memory indicators to enable tuning of the sleep mask however with the sleep mask kit it is possible to configure this one step more.
.http-config.allow_useragents- Within the HTTP-Config area it is possible to set blocked user agents, however in 4.4 the option to specifiy only allowed user agents became an option.- Teamserver Properties file - Described below.
Teamserver Properties File (TeamServer.prop)
I noticed this error when hooking up my CS4.4 team server:
[!] Properties file (/home/ubuntu/cobaltstrike/TeamServer.prop) was not found.
The file contains several optional parameters that can be used to further customise the settings used by the team server to validate screenshot and keylog callback data. It also enables tweaking of other options like the fix for the “HotCobalt” vulnerability. An example teamserver properties file is shown below:
#Cobalt Strike Team Server Properties
#Fri May 07 12:00:00 CDT 2021
# ------------------------------------------------
# Validation for screenshot messages from beacons
# ------------------------------------------------
# limits.screenshot_validated=true
# limits.screenshot_data_maxlen=4194304
# limits.screenshot_user_maxlen=1024
# limits.screenshot_title_maxlen=1024
# Stop writing screenshot data when Disk Usage reaches XX%
# Example: Off
#          "limits.screenshot_diskused_percent=0"
# Example: Stop writing screenshot data when Disk Usage reaches 95%
#          "limits.screenshot_diskused_percent=95"
# Default:
# limits.screenshot_diskused_percent=95
# ------------------------------------------------
# Validation for keystroke messages from beacons
# ------------------------------------------------
# limits.keystrokes_validated=true
# limits.keystrokes_data_maxlen=8192
# limits.keystrokes_user_maxlen=1024
# limits.keystrokes_title_maxlen=1024
# Stop writing keystroke data when Disk Usage reaches XX%
# Example: Off
#          "limits.keystrokes_diskused_percent=0"
# Example: Stop writing keystroke data when Disk Usage reaches 95%
#          "limits.keystrokes_diskused_percent=95"
# Default:
# limits.keystrokes_diskused_percent=95
From the cobalt strike site the properties file is described as:
Lines starting with “#” are comments.
limits._data_maxlenis the maximum size of screenshot/keylog data that will be processed. Callbacks exceeding this limit will be rejected.limits._validated=falsemeans that the three following “…_maxlen” settings are ignored- Setting any of the “…_maxlen” settings to zero will disable that particular setting
limits._diskused_percentsets the threshold for callback processing. Callbacks are rejected when disk usage exceeds the specified percentagelimits._diskused_percent=0(zero) disables this setting
Valid values are 0-99
Thanks to Joe Vest for updates regarding CS 4.5 taken from git:
Cobalt Strike 4.5 Updates and Considerations
Sleepmask and UDRL Updates
The sleepmask and UDRL(User Defined Reflective Loader) hooks were updated in version 4.5. If you use a custom UDRL and a custom sleepmask, there could be conflicts with profile settings if sleepmask = true
stage.userwx
This setting is a Boolean and informs the default loader to either use RWX or RX memory. At runtime beacon will either include or not include the .text section for masking. If the setting is set to TRUE, your user defined loader needs to set the protection on the .text section as RWX otherwise beacon will crash. If the setting is set to FALSE, your user defined loader should set the protection on the .text section as RX as the .text section will not be masked.
stage.obfuscate
This setting is a Boolean and informs the default loader to either copy the header or not copy the header into memory. At runtime beacon will either include or not include the header section for masking. If the setting is set to TRUE, your user defined reflective loader should not copy the header into memory as beacon will not mask the header section. If the setting is set to FALSE, your user defined loader should copy the header into memory as beacon will mask the header section.
Depending on how sophisticated your reflective loader is you will need to make sure the settings in the Malleable C2 profile will work with how the beacon payload is loaded into memory. With the BEACON_RDLL_GENERATE and BEACON_RDLL_GENERATE_LOCAL aggressor script hooks you do have the opportunity to modify your reflective loader by using the aggressor script pe_* functions.
- https://www.cobaltstrike.com/blog/user-defined-reflective-loader-(udrl)-update-in-cobalt-strike-4.5
- https://hstechdocs.helpsystems.com/manuals/cobaltstrike/current/userguide/content/topics/malleable-c2-extend_user-defined-rdll.htm
4.6 Updates and Considerations
Three new options were added that provide control to how much data (tasks and proxy) is transferred through a communication channel
set tasks_max_size "1048576";
set tasks_proxy_max_size "921600";
set tasks_dns_proxy_max_size "71680";
set tasks_max_size
4.6 adds three new options, the first of which is tasks_max_size which sets the maximum size (in bytes) of task(s) and proxy data that can be transferred through a communication channel at a check in of a beacon.
set tasks_proxy_max_size
tasks_proxy_max_size sets the maximum size (in bytes) of proxy data to transfer via the communication channel at check in, this in conjunction with the other two options gets around the 1mb limit previously encountered within CS.
set tasks_dns_proxy_max_size
tasks_proxy_max_size sets maximum size (in bytes) of proxy data to transfer via the DNS communication channel at a check-in of a beacon.
The tasks_max_size, tasks_proxy_max_size, and tasks_dns_proxy_max_size work in conjunction to create a data buffer to be transferred to beacon when a check-in occurs. This is to ensure that when a beacon checks in it requests a list of tasks and proxy data that are ready to be transferred to the beacon and any associated child processes or beacons. The data buffer starts to fill with task(s) followed by proxy data for the parent beacon. Then it continues this pattern for each child beacon until no more tasks or proxy data is available or the tasks_max_size setting will be exceeded by the next task or proxy data.
Conclusion
Hopefully this post has given you a deeper understanding of some of the nuances around CS profile creation and some of the areas to explore some more. It has not been a complete guide as I didn't want to re-write the already great malleable C2 documentation. However it gives a bit of guidance around areas that should be noted and some of the key differences between sections and areas that matter.
This post is also now featured in https://github.com/threatexpress/malleable-c2/blob/master/MalleableExplained.md
