
Orchestrating deployment of @myexploit2600's hacklab with Ansible and Vagrant [REDUX]
Deploy your hacklab using Ansible and Vagrant for fast, repeatable results. Building on the work by @myexploit2600, we're going to use Ansible and Vagrant to automate the manual steps of constructing a domain and vulnerable users.

![Orchestrating deployment of @myexploit2600's hacklab with Ansible and Vagrant [REDUX]](/content/images/size/w2000/2022/07/part_1_masthead.jpg)
Hey, thanks for coming to read this blog. This is an amalgamation of 5 posts I published on my blog in early 2021 that I took down cos I like breaking links on the internet! Andy has kindly let me republish it here after calling me out in his Steelcon Talk. I've tried my best to reformat correctly, remove references to being separate posts, and update links where necessary. I have not retested any of the playbooks or configs so it may be full of gremlins - play at your own risk.
You're a thoughtful and well-informed pentester/consultant/hacker, so you've obviously read the superb blog post by @myexploit2600 about building and attacking your own Active Directory lab. Now you'd like a repeatable way to set it up repeatedly with fresh virtual machines, without doing all the steps manually, right? Lucky you, here we go.
This short post will not be a technical deep dive, but rather a quick overview of the PowerShell scripts I used and the Ansible playbook I wrote to automate the deployment of my hacklab using @myexploit2600's guide.
"But Aidan, I've never heard of Ansible and I'd like to learn more before using it on my machine/network/smart fridge."
The good news is that Ansible is owned by Red Hat and has an exceptional attitude towards documentation. If you'd like something audio-visual, there is a 1h30m webinar with all the basics you need to know. Alternatively, if you prefer to read about Ansible, Red Hat's got you covered there too.
Virtual Machines (Windows server and workstation)
This blog is going to presume you've followed the short instructions on creating your server and workstation virtual machines; whether in Virtualbox, VMware, or Hyper-V. Since you can create snapshots or checkpoints in most commercial virtualisation software, rolling back to the earliest stage is a simple process that avoids having to re-deploy the virtual machine (VM). Get your VMs prepared as far as having reached this point in @myexploit2600's blog.
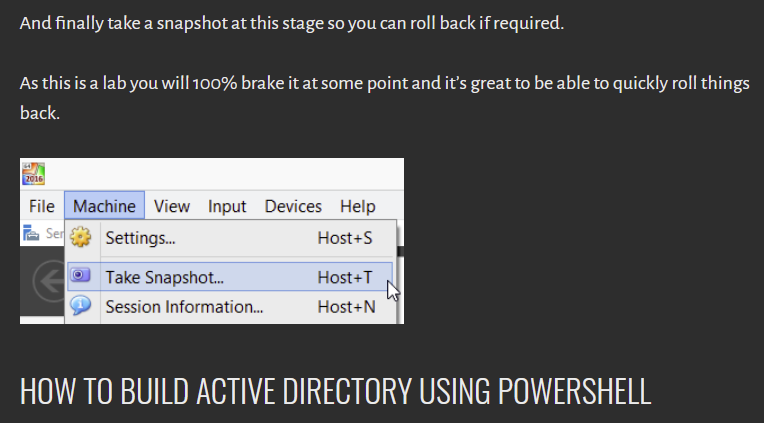
Once you've established this baseline installation, you can quickly roll back to here should you need or want to.
Firstly, we'll repeat the sanity check of confirming our PowerShell version before trying to execute anything. Here's a little statement taking advantage of PowerShell's comparison functions:
if ($PSVersionTable.PSVersion.Major -ge "5") {
	Write-Host "PowerShell $($PSVersionTable.PSVersion) is installed. Let's go!"
} else {
	Write-Host "PowerShell 5 or newer is not installed!"
    Write-Host "Installed version is $($PSVersionTable.PSVersion). You will (for now) be stuck setting up the domain using the manual CMD/Dcpromo approach for now. Check back later for the possibility of a playbook for this method."
}

Preparing Ansible and inventory
You may already be aware that Ansible cannot be run on a Windows host but it can manage them. If you have Windows Subsystem for Linux (WSL), you're good to go, otherwise you will need a Linux host of some description which can reach the hacklab hosts. As mentioned before, this is not a technical deep dive or a guide to Ansible, so I'll point to the relevant documentation.
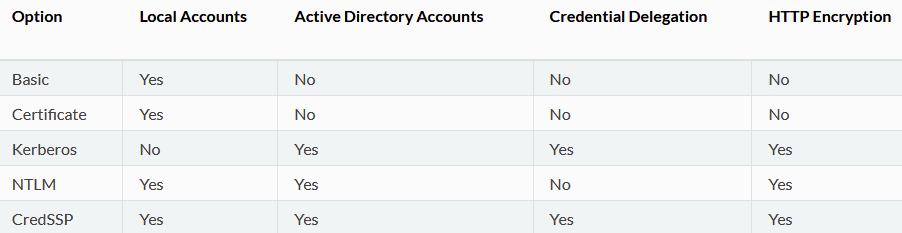
Managing Windows targets with Ansible requires the WinRM service be enabled. It is possible to use Windows OpenSSH but this remains experimental. Since we're setting up a hacklab, I'm going to take a few liberties when it comes to "best practice". We're going to use the script provided by the Ansible team to set up WinRM for all the Windows hosts in our lab. The script can be found here and can be executed with wanton disregard for safety by using the following snippet:
$url = "https://raw.githubusercontent.com/ansible/ansible/devel/examples/scripts/ConfigureRemotingForAnsible.ps1"
$file = "$env:temp\ConfigureRemotingForAnsible.ps1"

(New-Object -TypeName System.Net.WebClient).DownloadFile($url, $file)

powershell.exe -ExecutionPolicy ByPass -File $fileThis will expose an HTTP listener on port 5985 and a matching HTTPS listener on port 5986 using a self-signed certificate. It also enables Basic auth although we are going to use NTLM authentication, rather than just plaintext credentials. You can set up listeners in whichever way you feel comfortable. Ansible's WinRM module supports all of the standard Windows authentication methods so if you're concerned with establishing real confidentiality, the options are there. I'm setting this up in an isolated network segment since it's going to involve configuring an intentionally vulnerable domain, therefore a self-signed certificate is no big deal.
Once the listeners are established on your hacklab hosts, we can start work on our inventory. This part is straight forward. The inventory can be declared globally using /etc/ansible/hosts, or a contextual inventory file can be defined when executing a command or playbook using -i /file/path. I prefer to use the YAML format over the older INI format for inventory, but both are valid and supported by default.
all:
  hosts:
    server1.hacklab.local:
      ansible_user: Administrator
      ansible_password: Passw0rd!
    labpc1:
      ansible_user: IEUser
      ansible_password: Passw0rd!
      ansible_host: 192.168.1.201
  vars:
    ansible_connection: winrm
    ansible_winrm_transport: ntlm
    ansible_port: 5986
ansible_winrm_server_cert_validation: ignoreI've intentionally used an FQDN for the server and specified an IP for the workstation here to illustrate how host declarations can work. If your Ansible host cannot resolve the FQDN (no DNS, not in the hosts file, etc.), you would need to specify the ansible_host variable as exemplified for labpc1. I've used the global variable declaration because the authentication method for both is the same, but I have declared per-host variables for usernames and passwords. These will be the local credentials for the relevant hosts since there are no domain credentials yet. If you're using a different authentication method, you will need to swap out the variables as appropriate.
The next step is installing the necessary Ansible plugins to support interaction with Windows. community.windows will automatically install the ansible.windows plugins, but we'll stick it in the command for good measure.
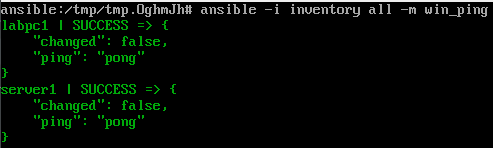
$ ansible-galaxy collection install community.windows ansible.windowsIf you'd like to test that the inventory file is sound and that WinRM has been configured correctly, you can now fire off a quick ad-hoc command using win_ping. The inventory flag and target can be omitted if you use the global inventory.
$ ansible -i my_inventory all -m win_pingAll being well, you should get console output that resembles mine..
There are a wide range of errors you could run into at this stage and it goes beyond the scope of this post to troubleshoot them all. I'm not on Twitter anymore but I suspect if you tweet about your problem and @ZephrFish, he'll get your question to me.
Assuming you have successful ping responses, we can now execute our playbook to configure the domain and then we're almost finished. Ansible, much like Python, is self-documenting code, which explains what it's doing via syntax. So in the interests of brevity, I'm going to share the complete playbook right here with some light commenting and then explain the few quirky parts.
---
- hosts: server
  gather_facts: true

  tasks:
  - name: Disable IPv6 because we're not barbarians
    win_shell: |
      if ((Get-NetAdapterBinding -Name "Ethernet" -ComponentID ms_tcpip6 | Select-Object -ExpandProperty Enabled) -match "True") {
        Disable-NetAdapterBinding -Name "*" -ComponentID ms_tcpip6
      }

  - name: Install domain services
    win_feature:
      name: AD-Domain-Services
      state: present
      include_management_tools: yes # This gives us Remote Server Administration Tools
      include_sub_features: yes
    register: install_ad_domain_services

  - name: Reboot if domain services installation requires it
    win_reboot:
    when: install_ad_domain_services.reboot_required

  - name: Add PowerShell module for AD commands
    win_psmodule:
      name: ADDSDeployment
      state: present

  - name: Create hacklab domain if it doesn't exist
    win_domain:
      create_dns_delegation: no
      database_path: C:\Windows\NTDS
      dns_domain_name: hacklab.local
      domain_netbios_name: hacklab
      forest_mode: Win2012R2
      install_dns: yes
      log_path: C:\Windows\NTDS
      safe_mode_password: Passw0rd!
      sysvol_path: C:\Windows\SYSVOL
    register: domain_creation

  - name: Reboot if domain creation requires it
    win_reboot:
    when: domain_creation.reboot_required

  - name: Install DNS feature if absent after domain setup
    win_feature:
      name: DNS
      state: present
      include_management_tools: yes
      include_sub_features: yes
    register: install_dns

  - name: Reboot if DNS installation requires it
    win_reboot:
    when: install_dns.reboot_required

  - name: Change hostname to server1
    win_hostname:
      name: server1
    register: dc_hostname_change

  - name: Reboot if hostname change requires it
    win_reboot:
    when: dc_hostname_change.reboot_required

  - name: Add victim user to the domain and Domain Admins group
    win_domain_user:
      name: user1
      state: present
      password: Passw0rd!
      update_password: on_create
      groups:
      - Domain Admins

  - name: Create SPN
    win_shell: Set-ADUser -Identity user1 -ServicePrincipalNames @{Add='http/server1.hacklab.local:80'}

  - name: Add attacker user to the domain
    win_domain_user:
      name: user2
      state: present
      password: Passw0rd!
      update_password: on_create

  - name: Point server DNS to itself
    win_dns_client:
      # This needs to be the name of the server's primary network adapter.
      adapter_names: Ethernet
      # We do both of the following directives because some Ansible versions require ipv4_addresses.
      # And some require dns_servers. I didn't dig through the changelogs to find out which.
      # They play fine together but if someone wants to do the conditional logic, I'll chuck it in here.
      ipv4_addresses: 192.168.1.200
      dns_servers: 192.168.1.200

- hosts: workstation
  gather_facts: true

  tasks:
  - name: IPv6 is a tool of the bourgeoisie and must be eradicated
    win_shell: |
      if ((Get-NetAdapterBinding -Name "Ethernet" -ComponentID ms_tcpip6 | Select-Object -ExpandProperty Enabled) -match "True") {
        Disable-NetAdapterBinding -Name "*" -ComponentID ms_tcpip6
      }

  - name: Change hostname to labpc1
    win_hostname:
      name: labpc1
    register: ws_hostname_change

  - name: Reboot if hostname change requires it
    win_reboot:
    when: ws_hostname_change.reboot_required

  - name: Point workstation DNS to DC
    win_dns_client:
      # This needs to be the name of the workstation's network adapter which shares a logical network with the DC.
      adapter_names: Ethernet
      # We do both of the following directives because some Ansible versions require ipv4_addresses.
      # And some require dns_servers. I didn't dig through the changelogs to find out which.
      # They play fine together but if someone wants to do the conditional logic, I'll chuck it in here.
      ipv4_addresses: 192.168.1.200
      dns_servers: 192.168.1.200

  - name: Add workstation to domain
    win_domain_membership:
      dns_domain_name: hacklab.local
      # hostname: labpc1 # This is ~~fucked~~ bugged. Doing it manually above instead before we add to domain.
      domain_admin_user: [email protected]
      domain_admin_password: Passw0rd!
      state: domain
    register: add_ws_to_domain

  - name: Reboot if adding to domain requires it
    win_reboot:
when: add_ws_to_domain.reboot_requiredIf you want to jump ahead to executing this with reckless abandon, then you can do so with ansible-playbook playbook.yml -i inventory.
As mentioned, there are a few quirky bits in the playbook to look at more closely. Firstly, we're calling the domain hacklab.local instead of server1.hacklab.local. The reason for this is to allow the domain name to more accurately reflect a real-world domain while we use server1 as the hostname for the Windows Server/Domain Controller. Simple enough really but if you want to revert this change, then switch the values on line 33 and 34 with server1.hacklab.local and server1 respectively, and then the value on line 60 with some other name of your choosing like dc01 or keith.
Secondly, we jump down to line 76 where we're breaking out into a raw PowerShell command to add our service principal name (SPN). I was unable to find an Ansible module that specifically supported adding an SPN so this is the dirty solution. Since it's not taking in any user-supplied arguments, it's safe enough, but it's just a bit untidy.
Lastly, there is some jiggery-pokery on lines 123 and 124, where we point our workstation to the newly configured domain controller. Varying versions of Ansible support one or both of the directives used here. In the interests of pOrTaBiLiTy, we're using both because they do not conflict, and Ansible will pass the task correctly even with both present.
All the other tasks, I believe, are self-explanatory, and the name key-value of each one gives a plain idea of what they're doing. You can search for ansible $insert_unknown_phrase_here to find extensive documentation on most of it.
As mentioned, the execution of the playbook is achieved by performing the following command, omitting the -i inventory if you're using the global inventory in /etc/ansible/hosts.
$ ansible-playbook playbook.yml -i inventoryThis will begin the execution of the playbook in sequence, configuring the server as the domain controller and provisioning the hacklab domain. Then it will create the victim and attacker users before attaching the workstation to the domain, ready to be used to carry out your kerberoasting attacks and more.
"You're using passwords in plaintext you monster"
I am indeed a monster because I live fast and have designs to die young. Ansible has a really neat secret management tool called Ansible Vault which you can read about and implement pretty quickly yourself. This is left as an exercise for the reader... ahem. Alternatively, you can employ a .env file, environment variables, or an Ansible vars file to separate the egregious use of plaintext passwords in the playbook. As previously alluded to, I'm running this in a Fort-Knox-slash-Fritzl-dungeon-style network segment where I'm not concerned about APT-01 robbing my noodz. If you have the desire for the most robust practices, Ansible is very much designed to enable that.
The beauty of the playbook is that you can replay it against the same hosts repeatedly without the fear of duplicating configurations, users, or other objects. Ansible is idempotent and will not try to repeat tasks unless explicitly told to do so. This is useful if you have reduced resources available and the installation of features takes longer than the timeout. Indeed, if the playbook fails due to a timeout, you can run it again with pretty high confidence that it will carry on right after the failed step.
Once the playbook is finished, you can jump on to your workstation, log in as hacklab.local\user2 and get roastin'.
Automating virtual machine deployment with Vagrant
Moving onwards, once again, we're going to be standing on the shoulders of giants and this time it's Jordan Borean (@BoreanJordan), one of the Ansible developers, and Gusztáv Varga (@gusztavvargadr), a principal software engineer at Knab bank.
For our lab, we need Windows Server 2016 and either Windows 7 or 10 (I've opted for 10). Jordan Borean who is specifically involved in the development of the Windows support in Ansible has produced a Server 2016 Vagrant box while Guztáv has produced a Windows 10 Enterprise box. Both boxes attach evaluation licenses on deployment (180 days and 90 days respectively) which ties very neatly into our desire to be able to nuke and reboot the hacklab at will. Both boxes use the credentials vagrant:vagrant and expose WinRM listeners, allowing us to immediately communicate with them using Ansible. What more could we ask for?
As a side note, having looked at the well-documented repositories used to construct both boxes, I may look at spinning forked copies which are prepared specifically for the hacklab to save some time at the Ansible stage.
Vagrant.configure("2") do |config|
    boxes = [
        {
            "name" => "server",
            "hostname" => "server1",
            "box" => "jborean93/WindowsServer2016",
            "vmname" => "Hacklab - Windows Server",
            "cpus" => 2
        },
        {
            "name" => "workstation",
            "hostname" => "labpc1",
            "box" => "gusztavvargadr/windows-10-enterprise",
            "vmname" => "Hacklab - Windows Workstation",
            "cpus" => 1
        },
    ]

    boxes.each do |opts|
        config.vm.define opts["name"] do |machine|
            machine.vm.box = opts["box"]
            machine.vm.synced_folder ".", "/vagrant", disabled: true
            machine.vm.hostname = opts["hostname"]
            machine.vm.network "public_network", bridge: "Bridge"
            machine.vm.provider "hyperv" do |hyperv|
                hyperv.enable_virtualization_extensions = true
                hyperv.linked_clone = true
                hyperv.vmname = opts["vmname"]
                hyperv.memory = 2048
                hyperv.cpus = opts["cpus"]
                hyperv.ip_address_timeout = 300
            end
        end
    end
end"This is written for Hyper-V?! You said you'd do it in Virtualbox. You sit upon a throne of lies!"
Correct. My lab environment runs on a Hyper-V server so this is my working, tested Vagrantfile that I've used to deploy to my own infrastructure and that I know works. Fear not, however, as I will show you, with the magic of ~*~aNoThEr CoDe SnIpPeT~*~ how to configure it for Virtualbox. If you are using Hyper-V like me, you will note that the Virtualbox Vagrantfile specifies a network setting absent from the Hyper-V Vagrantfile. This is because Vagrant cannot (yet) manage Hyper-V network adapters. As such, when you launch the Vagrantfile, you will get an interactive prompt to select which interface you'd like to supply to the machine.
Vagrant.configure("2") do |config|
    boxes = [
        {
            "name" => "server",
            "hostname" => "server1",
            "box" => "jborean93/WindowsServer2016",
            "vmname" => "Hacklab - Windows Server",
            "cpus" => 2
        },
        {
            "name" => "workstation",
            "hostname" => "labpc1",
            "box" => "gusztavvargadr/windows-10-enterprise",
            "vmname" => "Hacklab - Windows Workstation",
            "cpus" => 1
        },
    ]

    boxes.each do |opts|
        config.vm.define opts["name"] do |machine|
            machine.vm.box = opts["box"]
            machine.vm.synced_folder ".", "/vagrant", disabled: true
            machine.vm.hostname = opts["hostname"]
            machine.vm.network "private_network", type: "dhcp", name: "vboxnet3"
            machine.vm.provider "virtualbox" do |virtualbox|
                virtualbox.gui = true
                virtualbox.name = opts["vmname"]
                virtualbox.check_guest_additions = true
                virtualbox.linked_clone = true
                virtualbox.memory = 2048
                virtualbox.cpus = opts["cpus"]
            end
        end
    end
endThis Vagrantfile will configure the boxes similarly to the Hyper-V variant above. You can adjust the memory and CPU assignments to whatever fits best for your available resources. The workstation will run fairly with 2GB RAM and 1 CPU but the server will start to creak a little with less than 2 CPUs while 2GB memory will make it a little sluggish.
The Virtualbox configuration sets up both boxes on the host-only adapter but you can change these as you see fit. Take a look at HashiCorp's documentation for more guidance.

Invoking the Ansible playbook with Vagrant
The key benefit to nesting the Ansible playbook into the Vagrantfile is that we don't need to define an inventory or worry about authentication. Vagrant already has access to the machines and can execute the playbook based on the hostnames defined. We need to modify the playbook a little to integrate with Vagrant and to account for some differences between the standard ISO/VHD evaluation versions from Microsoft and the Vagrant boxes we're using to replace them.
Firstly, we're force-installing the DNS service because of some funkiness I ran into during the setup stages. We need it installed anyway so there's no redundant steps here and this ensures we get the services we need. Secondly, we're targeting Vagrant's dynamic Ansible inventory to get the IP addresses for setting DNS on both hosts. Lastly, we're disabling IPv6 because it is the devil's work and we don't abide by hexadecimal layer 3 addressing round these parts - we worship the dot-decimal notation and so should you.
---
- hosts: server
  gather_facts: true

  tasks:
  - name: Disable IPv6 because we're not barbarians
    win_shell: |
      if ((Get-NetAdapterBinding -Name "Ethernet" -ComponentID ms_tcpip6 | Select-Object -ExpandProperty Enabled) -match "True") {
        Disable-NetAdapterBinding -Name "*" -ComponentID ms_tcpip6
      }

  - name: Install domain services
    win_feature:
      name: AD-Domain-Services
      state: present
      include_management_tools: yes # This gives us Remote Server Administration Tools
      include_sub_features: yes
    register: install_ad_domain_services

  - name: Reboot if domain services installation requires it
    win_reboot:
    when: install_ad_domain_services.reboot_required

  - name: Add PowerShell module for AD commands
    win_psmodule:
      name: ADDSDeployment
      state: present

  - name: Create hacklab domain if it doesn't exist
    win_domain:
      create_dns_delegation: no
      database_path: C:\Windows\NTDS
      dns_domain_name: hacklab.local
      domain_netbios_name: hacklab
      forest_mode: Win2012R2
      install_dns: yes
      log_path: C:\Windows\NTDS
      safe_mode_password: Passw0rd!
      sysvol_path: C:\Windows\SYSVOL
    register: domain_creation

  - name: Reboot if domain creation requires it
    win_reboot:
    when: domain_creation.reboot_required

  - name: Install DNS feature if absent after domain setup
    win_feature:
      name: DNS
      state: present
      include_management_tools: yes
      include_sub_features: yes
    register: install_dns

  - name: Reboot if DNS installation requires it
    win_reboot:
    when: install_dns.reboot_required

  - name: Point server DNS to itself
    win_dns_client:
      # This needs to be the name of the server's primary network adapter.
      adapter_names: Ethernet
      # We do both of the following directives because some Ansible versions require ipv4_addresses.
      # And some require dns_servers. I didn't dig through the changelogs to find out which.
      # They play fine together but if someone wants to do the conditional logic, I'll chuck it in here.
      ipv4_addresses: "{{ hostvars['server'].ansible_host }}"
      dns_servers: "{{ hostvars['server'].ansible_host }}"

  - name: Add victim user to the domain and Domain Admins group
    win_domain_user:
      name: user1
      state: present
      password: Passw0rd!
      update_password: on_create
      groups:
      - Domain Admins

  - name: Create SPN
    win_shell: Set-ADUser -Identity user1 -ServicePrincipalNames @{Add='http/server1.hacklab.local:80'}

  - name: Add attacker user to the domain
    win_domain_user:
      name: user2
      state: present
      password: Passw0rd!
      update_password: on_create

- hosts: workstation
  gather_facts: true

  tasks:
  - name: IPv6 is a tool of the bourgeoisie and must be eradicated
    win_shell: |
      if ((Get-NetAdapterBinding -Name "Ethernet 2" -ComponentID ms_tcpip6 | Select-Object -ExpandProperty Enabled) -match "True") {
        Disable-NetAdapterBinding -Name "*" -ComponentID ms_tcpip6
      }

  - name: Point workstation DNS to DC
    win_dns_client:
      # This needs to be the name of the workstation's network adapter which shares a logical network with the DC.
      # For the Vagrant box in this setup, the adapter is called 'Ethernet 2'
      adapter_names: Ethernet 2
      # We do both of the following directives because some Ansible versions require ipv4_addresses.
      # And some require dns_servers. I didn't dig through the changelogs to find out which.
      # They play fine together but if someone wants to do the conditional logic, I'll chuck it in here.
      ipv4_addresses: "{{ hostvars['server'].ansible_host }}"
      dns_servers: "{{ hostvars['server'].ansible_host }}"

  - name: Add workstation to domain
    win_domain_membership:
      dns_domain_name: hacklab.local
      # hostname: labpc1 # This is ~~fucked~~ bugged. Doing it manually above instead before we add to domain.
      domain_admin_user: [email protected]
      domain_admin_password: Passw0rd!
      state: domain
    register: add_ws_to_domain

  - name: Reboot if adding to domain requires it
    win_reboot:
when: add_ws_to_domain.reboot_requiredAs mentioned, we no longer need to define an inventory because Vagrant can execute the connection for us. We do, however, have to override its default connection type to make it use NTLM. Fortunately, we can do that in the same code block where we tell it to use our playbook. You need to add the following snippet inside the parent code block of the Vagrantfile from above (i.e. after the Vagrant.configure... line and before the last end).
ruby
config.vm.provision "ansible" do |ansible|
    ansible.playbook = "playbook.yml"
    ansible.limit = "all"
    ansible.host_vars = {
    	"server" => {"ansible_winrm_transport" => "ntlm"},
    	"workstation" => {"ansible_winrm_transport" => "ntlm"}
    }
endIf you insert the code block as-is, it will generally execute once per machine meaning that things will get double provisioned - which is absolutely fine. However, if we use a little conditional magic, we can make sure to invoke it only once. Stick the following code block in instead, as the last thing to be executed inside the config.vm.define opts["name"] do |machine| loop, and it will ensure the playbook is only executed after the workstation comes up, which will only be provisioned after the server is up.
if opts["name"] == "workstation"
	machine.vm.provision "ansible" do |ansible|
		ansible.playbook = "playbook.yml"
		ansible.limit = "all"
		ansible.host_vars = {
			"server" => {"ansible_winrm_transport" => "ntlm"},
			"workstation" => {"ansible_winrm_transport" => "ntlm"}
		}
	end
endYou need to put the Vagrantfile and playbook.yml in the same directory or change the location directive (ansible.playbook = "playbook.yml").
You will need, obviously, to have installed Vagrant and Ansible on the host you're using to build the lab. The build can then be started by simply running vagrant up in the directory. If you have to re-run it due to any timeouts or non-blocking failures, you'll need to run the same command but include the --provision flag to ensure Ansible is executed again too - this also works if you want to apply changes you've made to the Ansible playbook post-deployment. If all goes well, you will end up with a fully configured hacklab ready to go. If you want to power the lab down, you can use vagrant halt, and if you want to scrub the lot, vagrant destroy.
Add some more users!
"I want more users to target, please."
Sure thing. We're going to employ Ansible again to add 4 more users to the domain. As usual, let's get the playbook and then explore the important parts.
---
- hosts: server
  gather_facts: true

  tasks:
  - name: Add user with AES-256 encrypted service tickets # next task switches tickets to AES-256
    win_domain_user:
      name: user3
      state: present
      password: Passw0rd!
      update_password: on_create
      groups:
      - Enterprise Admins

  - name: Switch ticket encryption type for user3 to AES-256
    win_shell: Set-ADUser -Identity "user3" -KerberosEncryptionType AES256

  - name: Create SPN for user with AES-256 tickets
    win_shell: Set-ADUser -Identity user3 -ServicePrincipalNames @{Add='http/server1.hacklab.local:81'}

  - name: Add user with pre-authentication disabled (AS-REP roastable) # next task disables the pre-auth
    win_domain_user:
      name: user4
      state: present
      password: Passw0rd!
      update_password: on_create
      groups:
      - Backup Operators

  - name: Disable pre-auth for user4
    win_shell: |
      $User = Get-ADUser -Identity "user4" -Properties DoesNotRequirePreAuth
      $User.DoesNotRequirePreAuth = "True"
      Set-ADUser -Instance $User

  - name: Create SPN for user with pre-auth disabled
    win_shell: Set-ADUser -Identity user4 -ServicePrincipalNames @{Add='http/server1.hacklab.local:82'}

  - name: Add Key Delegation Service root key if there isn't one (required for gMSA)
    win_shell: |
      if ((Get-KdsRootKey | Select-Object -Expand Count) -ne 1) { Add-KdsRootKey -EffectiveTime ((Get-Date).AddHours(-10)) }

  - name: Add Group Managed Service Account (gMSA) if doesn't exist
    win_shell: |
      if (!(Get-ADServiceAccount -Filter "Name -eq 'user5'")) { New-ADServiceAccount -Name "user5" -DNSHostName "user5.hacklab.local" -Enabled $True -ServicePrincipalNames "http/server1.hacklab.local:83" -ManagedPasswordIntervalInDays 30 }

  - name: Add user with very strong password
    win_domain_user:
        name: user6
        state: present
        password: "ADqxdFe_#yiq4:DM+9B#l0Z,-x&k)_FF*SqcLgMTYZQ2WKOKaOtpDp#VY).9:AKY"
        update_password: on_create
        groups:
        - Domain Admins

  - name: Create SPN for user with strong password
win_shell: Set-ADUser -Identity user6 -ServicePrincipalNames @{Add='http/server1.hacklab.local:84'}The first user we add to the domain is configured to use AES-256 for Kerberos ticket encryption. However, it still uses a weak password. Simply changing the encryption type in use does not mitigate the risk of kerberoasting.
The second new user has the domain pre-authentication requirement disabled. This means that the user is susceptible to an attack termed AS-REP roasting. In short, you can kerberoast this user without domain credentials. Get yourself onto a logical network location where you can simply communicate with a domain controller and you can now recover kerberos tickets for any user with pre-authentication disabled.
The third user is a group managed service account, meaning that its password is managed automagically. The password set is 240 bytes (120 characters) and is generated in a cryptographically secure fashion. If you crack the password on this account, please let me borrow your access to the NSA's cracking farm.
Important: In order to add the Key Delegation Server root key, we need to be a Domain Administrator, instead of a built-in Administrator on the DC. We can achieve this in one of two ways. We can promote the vagrant user we've been using for Ansible (which is a built-in admin) or we can change our entry for the DC in our inventory to use user1 instead as it is already a Domain Admin. It's up to you which way you'd like to do this.
The fourth and final user added has a complex, 64-character, alphanumeric and symbol laden password. Short of adding this password directly to your cracking dictionary, this would be resistant to cracking attempts. Despite the fact the user is still using RC4 encryption for Kerberos tickets, it is exceedingly unlikely that even a brute-force guessing attack would recover the plaintext.
The idea for the accounts added here was inspired by @ZephrFish's Paving the way to DA series, which I highly recommend if you'd like a delicious wine pairing to go with this blog. In the first part of the series, Andy demonstrates an attack targeting an older vulnerability in Windows domains affecting Group Policy Preferences. As he discusses, this issue only affects Server 2008 R2 or earlier, since Microsoft rolled out a patch in 2014. We can't, therefore, target the Server 2016 instance in our lab and we'll need to spin up a new server.
There are a few ways we could approach this but I'm going to create an isolated domain for this scenario because, frankly, managing Windows Server 2k8 from Ansible is a bit of a ballache and it was hard enough getting it working in its own domain. Additionally, we're going to have to do some fakery because, as of yet, I have been unable to find a way to programmatically interact with the necessary Group Policy Preference. Not to worry though, the scenario will behave familiarly enough to a real world environment to be useful practice.
Provisioning the lab
Firstly, we have to provision our Windows 2k8R2 server. As per usual, lets get the playbook out and have a look at what we've got.
yaml
---
- hosts: server2k8
  gather_facts: true

  tasks:
  - name: Disable IPv6 for religious reasons
    win_shell: |
      if (!(Get-ItemProperty HKLM:\SYSTEM\CurrentControlSet\Services\Tcpip6\Parameters\).PSObject.Properties.Name -contains "DisabledComponents") {
        New-ItemProperty HKLM:\SYSTEM\CurrentControlSet\Services\Tcpip6\Parameters\ -Name DisabledComponents -Value 0xffffffff -PropertyType DWord
      }

  - name: Install domain services
    win_feature:
      name: AD-Domain-Services
      state: present
      include_management_tools: yes # This gives us Remote Server Administration Tools
    register: install_ad_domain_services

  - name: Reboot if domain services installation requires it
    win_reboot:
    when: install_ad_domain_services.reboot_required

  - name: Install RSAT AD Powershell module
    win_feature:
      name: RSAT-AD-Powershell
      state: present
      include_sub_features: yes
    register: install_rsat_ad_ps

  - name: Reboot if domain services installation requires it
    win_reboot:
    when: install_rsat_ad_ps.reboot_required

  - name: Create hacklab domain if it doesn't exist (reboots after creation)
    win_shell: |
      if (!(Get-WmiObject -Class Win32_ComputerSystem).PartOfDomain) {
        dcpromo /unattend /InstallDns:yes /dnsOnNetwork:yes /replicaOrNewDomain:domain /newDomain:forest /newDomainDnsName:gpp.hacklab.local /DomainNetbiosName:gpp.hacklab /databasePath:"C:\Windows\NTDS" /logPath:"C:\Windows\NTDS" /sysvolpath:"C:\Windows\SYSVOL" /safeModeAdminPassword:Passw0rd! /forestLevel:4 /domainLevel:4 /rebootOnCompletion:yes
      }

  - name: Point server DNS to itself
    win_dns_client:
      # This needs to be the name of the server's primary network adapter.
      adapter_names: Local Area Connection
      # We do both of the following directives because some Ansible versions require ipv4_addresses.
      # And some require dns_servers. I didn't dig through the changelogs to find out which.
      # They play fine together but if someone wants to do the conditional logic, I'll chuck it in here.
      ipv4_addresses: "{{ hostvars['server2k8'].ansible_host }}"
      dns_servers: "{{ hostvars['server2k8'].ansible_host }}"

  - name: Add standard user to domain for workstation to use
    win_shell: |
      if (!(Get-ADServiceAccount -Filter "Name -eq 'user1'")) {
        New-ADUser -SamAccountName "user1" -Name "user1" -Enabled $true -AccountPassword (ConvertTo-SecureString -AsPlainText "Passw0rd!" -Force)
}There is a lot going on here. If you've been following along the past few posts, it will look vaguely familiar but you will likely note the increase in use of raw shell commands. This is primarily because the Ansible modules rely on newer PowerShell modules and updated functionality of modern Windows server versions. I've endeavoured to make these as idempotent and error-resistant as possible but I make no guarantees.
Once executed, the playbook will put the server in much the same state as we have our 2016 server. However, before we can use the playbook, we need to spin up the virtual machine. Let's look at our Vagrantfile.
Vagrant.configure("2") do |config|
    boxes = [
        {
            "name" => "server2k8",
            "hostname" => "server2k8",
            "box" => "jborean93/WindowsServer2008R2",
            "vmname" => "Hacklab - Windows Server 2008",
            "cpus" => 2
        },
        {
            "name" => "workstation",
            "hostname" => "labpc1",
            "box" => "gusztavvargadr/windows-10-enterprise",
            "vmname" => "Hacklab - Windows Workstation",
            "cpus" => 1
        }
    ]

    boxes.each do |opts|
        config.vm.define opts["name"] do |machine|
            machine.vm.box = opts["box"]
            machine.vm.synced_folder ".", "/vagrant", disabled: true
            machine.vm.hostname = opts["hostname"]
            machine.vm.network "public_network", bridge: "Bridge"
            machine.vm.provider "hyperv" do |hyperv|
                hyperv.enable_virtualization_extensions = true
                hyperv.linked_clone = true
                hyperv.vmname = opts["vmname"]
                hyperv.memory = 2048
                hyperv.cpus = opts["cpus"]
                hyperv.ip_address_timeout = 300
            end
            if opts["name"] == "workstation"
                machine.vm.provision "ansible" do |ansible|
                    ansible.playbook = "playbook.yml"
                    ansible.limit = "all"
                    ansible.host_vars = {
                        "server2k8" => {"ansible_winrm_transport" => "ntlm"},
                        "workstation" => {"ansible_winrm_transport" => "ntlm"}
                    }
                end
            end
        end
    end
endOnce again, we're relying on the hard work of Jordan Borean. This is my Hyper-V version but I've run up a quick Virtualbox version too.
Vagrant.configure("2") do |config|
    boxes = [
        {
            "name" => "server2k8",
            "hostname" => "server2k8",
            "box" => "jborean93/WindowsServer2008R2",
            "vmname" => "Hacklab - Windows Server 2008",
            "cpus" => 2
        },
        {
            "name" => "workstation",
            "hostname" => "labpc1",
            "box" => "gusztavvargadr/windows-10-enterprise",
            "vmname" => "Hacklab - Windows Workstation",
            "cpus" => 1
        }
    ]

    boxes.each do |opts|
        config.vm.define opts["name"] do |machine|
            machine.vm.box = opts["box"]
            machine.vm.synced_folder ".", "/vagrant", disabled: true
            machine.vm.hostname = opts["hostname"]
            machine.vm.network "public_network", bridge: "Bridge"
            machine.vm.provider "hyperv" do |hyperv|
                hyperv.enable_virtualization_extensions = true
                hyperv.linked_clone = true
                hyperv.vmname = opts["vmname"]
                hyperv.memory = 2048
                hyperv.cpus = opts["cpus"]
                hyperv.ip_address_timeout = 300
            end
            if opts["name"] == "workstation"
                machine.vm.provision "ansible" do |ansible|
                    ansible.playbook = "playbook.yml"
                    ansible.host_vars = {
                        "server2k8" => {"ansible_winrm_transport" => "ntlm"},
                        "workstation" => {"ansible_winrm_transport" => "ntlm"}
                    }
                end
            end
        end
    end
endImportant: When you first run this Vagrantfile, it is likely going to run into an error - the Windows 2008 Server may not be licensed. The solution is quick and easy. Connect to the VM via the GUI and when the dialog loads, choose the Ask me later option. After this, you can run vagrant up --provision and the provisioning will proceed as normal. I will try to solve this over the next few days and get rid of this friction - for the time being, sorry, but this is the best option.
I've also provisioned a Windows 10 workstation specifically for this scenario but this is not explicitly necessary. You can repurpose the existing Windows 10 host. Either way, you'll want to target it with a playbook similar to this. The only modification I've made is to target the gpp.hacklab.local domain defined in the earlier playbook. You will need to swap out the comments on line 19 and 20.
---
- hosts: workstation
  gather_facts: true

  tasks:
  - name: Bring down IPv6 with our mighty PowerShell commands
    win_shell: |
      if ((Get-NetAdapterBinding -Name "Ethernet 2" -ComponentID ms_tcpip6 | Select-Object -ExpandProperty Enabled) -match "True") {
        Disable-NetAdapterBinding -Name "*" -ComponentID ms_tcpip6
      }

  - name: Point workstation DNS to DC
    win_dns_client:
      # This needs to be the name of the workstation's network adapter which shares a logical network with the DC.
      # For the Vagrant box in this setup, the adapter is called 'Ethernet 2'
      adapter_names: Ethernet 2
      # We do both of the following directives because some Ansible versions require ipv4_addresses.
      # And some require dns_servers. I didn't dig through the changelogs to find out which.
      # They play fine together but if someone wants to do the conditional logic, I'll chuck it in here.
      ipv4_addresses: # Replace this comment with Windows Server 2008 IP address
      dns_servers: # Replace this comment with Windows Server 2008 IP address

  - name: Add workstation to domain
    win_domain_membership:
      dns_domain_name: gpp.hacklab.local
      domain_admin_user: [email protected]
      domain_admin_password: Passw0rd!
      state: domain
    register: add_ws_to_domain

  - name: Reboot if adding to domain requires it
    win_reboot:
when: add_ws_to_domain.reboot_requiredOnce you have provisioned the server and either spun up a new workstation or redirected the other, we can create our SYSVOL/GPP scenario from @ZephrFish's post.
Creating the attack scenario
This was an enormous pain in the arse. Newer versions of PowerShell and associated modules introduced the ability to target more of the Group Policy Management (GPM) options. Namely, Get-GPRegistryValue and Set-GPPrefRegistryValue, which I expected to allow me to access the necessary entries to simulate the weakness detailed in Zephr's blog. Nope. That was foolish of me to assume they did what they were supposed to do. The only way to create a Group Policy Preference (GPP) defining a built-in Administrator password, as far as I have been able to divine, is through the GPM GUI. This, as you would expect, does not go very well with the idea of automating the lab.
However! Since we know how this weakness occurs, we can manually simulate the conditions in a way that lets us practice the attack in a realistic manner. When the GPP is created, it writes a directory to SYSVOL which contains all the components needed for us to perform the actual attack. So if we produce it using the GUI and then create a copy of the directory and contents, we can, in a sense, replay it by pushing the copy to the correct location. This is not ideal because it is not how most systems administrators would handle such administration (although, it is not entirely farfetched that some might do it this way). So, lets take a look at what we're going to push into SYSVOL. You do not need to repeat the following steps yourself because I'm going to provide the zipped GPO for you. However, if you want to produce your own, here's how.


In the subdirectory path Machine\Preferences\Groups, we find Groups.xml.

Here we can now see the cpassword field where the eNcRyPtEd password resides. The next step is to stick this whole directory tree in a zip archive so we can pull it to our host system and use it to inject the policy later. First though, let's quickly follow one step of Zephr's guide to make sure the policy is targetable.

That's a bingo. We can see the path to the Groups.xml that the script is pulling the cpassword value out of and very kindly decrypting for us too! Now then, let's delete the policy via the GUI and then use Ansible to push the zipped policy right back into SYSVOL. Deleting the GPO is as easy as right-clicking on it from the GUI and its associated subdirectory will then dissapear from the \\hacklab.local\SYSVOL\hacklab.local\Policies directory.
Injecting the vulnerable GPO
The first step in Ansible is to copy the GPO archive on to the server and then we can simply unzip the archive. Thankfully, this is a really simple operation.
---
  - name: Copy GPO archive onto server
    win_copy:
      src: ./SYSVOL_GPP_cpassword.zip
      dest: C:\Users\vagrant\SYSVOL_GPP_cpassword.zip

  - name: Expand GPO archive into SYSVOL
    win_unzip:
      src: C:\Users\vagrant\SYSVOL_GPP_cpassword.zip
dest: C:\Windows\SYSVOL\sysvol\hacklab.local\Policies\As I said above, I've pulled the GPO from my server and zipped it up for you to use if you'd like to save time. If you want to use mine, you can download it here:
Download SYSVOL_GPP_cpassword.zip
Once you've downloaded it or created your own, you can stick it in the directory with your Ansible playbook and Vagrantfile. The snippet above, if added to your playbook or run separately (you'll need to add a hosts and tasks declaration), will push the archive onto the target and then unpack the archive into the correct subdirectory of the SYSVOL share.

And if we jump back on to our workstation and run Get-GPPPassword again, we can once again collect the decrypted cpassword value.

That was a lot of work to pull a password out of a file, right? However, we now have a viable Server 2008 (R2) lab. We could explore some legacy attack paths and techniques. I can say confidently that I still encounter 2008 servers in the wild - hell, 2003 still hasn't fully died a death yet - so there's a lot of value to be found in learning how to break legacy environments.
Domain trust exploitation
Compromising a Domain Admin user during a pentest is a great result. Leveraging that user to establish a foothold into adjacent forests by exploiting domain trusts could lead to much more serious implications for your client, their suppliers, and their customers. I'm not going to belabour an existing attack by explaining how it works when others have done a better job than me already so please go and have a quick read of @spotheplanet's iRed.team blog about escalating from Domain Admin to Enterprise Admin.
We're going to deploy three Windows domain controllers and two domain forests, and a child domain for one of the forests. Once deployed, the lab will resemble the setup right before the Back to Empire: From DA to EA section in @spotheplanet's blog.
I'll share the playbook and Vagrant file as usual but you might notice some changes in the way things are done earlier. The biggest change is the switch to using OpenSSH to communicate with the VMs. WinRM was proving to be grossly unreliable. Any amount of network volatility could result in a failed provision and a borked DC. The change to OpenSSH has massively increased the reliability of both the Vagrant and Ansible stages of provisioning.
The second big change is the prevalent use of win_shell to invoke PowerShell commands directly, instead of relying on Ansible modules. This is mostly due to an absence of the right functionality to get the domains behaving exactly as I needed them to. As much as possible, I've written in conditional logic to prevent replying commands if they'll throw an error due to existing or duplicate objects in the AD.
Lastly, I'm not going to supply the Virtualbox version of the Vagrantfile because it should be easy enough now to make the changes by referring to previous config versions.
Vagrant.configure("2") do |config|
    boxes = [
        {
            "name" => "senedd",
            "hostname" => "dc-senedd",
            "vmname" => "Hacklab - Senedd DC",
            "cpus" => 2
        },
        {
            "name" => "holyrood",
            "hostname" => "dc-holyrood",
            "vmname" => "Hacklab - Holyrood DC",
            "cpus" => 2
        },
        {
            "name" => "westminster",
            "hostname" => "dc-westminster",
            "vmname" => "Hacklab - Westminster DC",
            "cpus" => 2
        }
    ]

    # The Server set up does a number of reboot loops and Vagrant gets ahead of itself and then errors out.
    # On average, it takes 15-30 mins to provision. Timeouts need to be tuned to account for this.

    boxes.each do |opts|
        config.vm.define opts["name"] do |machine|
            machine.vm.box = "jborean93/WindowsServer2016"
            machine.vm.synced_folder ".", "/vagrant", disabled: true
            machine.vm.hostname = opts["hostname"]
            machine.vm.network "public_network", bridge: "Bridge"
            machine.vm.communicator = "winssh"
            machine.vm.boot_timeout = 1800
            machine.vm.provider "hyperv" do |hyperv|
                hyperv.enable_virtualization_extensions = true
                hyperv.enable_enhanced_session_mode = true
                hyperv.linked_clone = true
                hyperv.vmname = opts["vmname"]
                hyperv.memory = 2048
                hyperv.cpus = opts["cpus"]
                hyperv.ip_address_timeout = 1800
            end

            config.ssh.username = 'vagrant'
            config.ssh.password = 'vagrant'
            config.ssh.connect_timeout = 1800
            config.winssh.keep_alive = true

            if opts["name"] == "westminster"
                machine.vm.provision "ansible" do |ansible|
                    ansible.playbook = "playbook.yml"
                    ansible.host_vars = {
                        "senedd" => {
                            "ansible_winrm_transport" => "ssh",
                            "ansible_shell_type" => "cmd",
                            "ansible_ssh_password" => "vagrant",
                            "ansible_ssh_common_args" => "-o StrictHostKeyChecking=no"
                        },
                        "holyrood" => {
                            "ansible_winrm_transport" => "ssh",
                            "ansible_shell_type" => "cmd",
                            "ansible_ssh_password" => "vagrant",
                            "ansible_ssh_common_args" => "-o StrictHostKeyChecking=no"
                        },
                        "westminster" => {
                            "ansible_winrm_transport" => "ssh",
                            "ansible_shell_type" => "cmd",
                            "ansible_ssh_password" => "vagrant",
                            "ansible_ssh_common_args" => "-o StrictHostKeyChecking=no"
                        }
                    }
                end
            end
        end
    end
end
Looking through the Vagrantfile, we're provisioning three Windows 2016 servers, named Westminster, Holyrood, and Senedd - can you see where this is going yet?
The scenario we're going to construct is one of a independent DC which has broken away from the shackles of an oppressive forest to set up its own, nicer forest, with continental friends. Residents of one of the remaining child domains of the original forest, seeing this grand leap for independence, are inspired to make their own push for freedom by.. exploiting a domain trust. The Ansible playbook is going to establish two forests; one on the Holyrood DC and another on the Westminster DC. The Senedd DC will then be attached to the Westminster domain before being nested into a child domain. After that, we'll establish a unidirectional trust between the two forests, creating an avenue by which an ambitious user in the Senedd child domain might achieve privileged access to the Holyrood domain.
---
- hosts: all
  gather_facts: no

  tasks:
  - name: Confirm SSH connectivity before proceeding
    wait_for_connection:
      delay: 60
      timeout: 300

  - name: Gather facts
    setup:
    any_errors_fatal: true

  - name: Disable IPv6 because Baphomet demands it
    win_shell: |
      if ((Get-NetAdapterBinding -Name "Ethernet" -ComponentID ms_tcpip6 | Select-Object -ExpandProperty Enabled) -eq $True) {
        Disable-NetAdapterBinding -Name "*" -ComponentID ms_tcpip6
      }
    register: disable_ipv6
    changed_when: disable_ipv6.stdout != ""

  - name: Install domain services
    win_shell: |
      if ((Get-WindowsFeature -Name AD-Domain-Services | Select-Object -ExpandProperty Installed) -eq $False) {
        Install-WindowsFeature -Name AD-Domain-Services -IncludeManagementTools -Restart
      }
    register: install_ad_domain_services
    changed_when: install_ad_domain_services.stdout != ""

  - name: Add PowerShell module for AD commands
    win_psmodule:
      name: ADDSDeployment
      state: present

- hosts: westminster

  tasks:
  - name: Create domain
    any_errors_fatal: true # If the domain doesn't exist, we're humped so stop here.
    win_domain:
      create_dns_delegation: no
      database_path: C:\Windows\NTDS
      dns_domain_name: hacklab.local
      domain_netbios_name: hacklab
      forest_mode: Win2012R2
      install_dns: yes
      log_path: C:\Windows\NTDS
      safe_mode_password: Passw0rd!
      sysvol_path: C:\Windows\SYSVOL
    register: domain_creation

  - name: Reboot for domain creation
    win_reboot:
    when: domain_creation.reboot_required

  - name: Add EA/DA/SA user
    any_errors_fatal: true # If this user doesn't exist, we can't do the other DC's so stop here.
    win_domain_user:
      name: wm.ea
      state: present
      password: Passw0rd!
      update_password: on_create
      groups:
      - Domain Admins
      - Schema Admins
      - Enterprise Admins

- hosts: senedd

  tasks:
  - name: Point child DC DNS to parent DC
    win_dns_client:
      adapter_names: Ethernet
      ipv4_addresses: "{{ hostvars['westminster'].ansible_host }}"
      dns_servers: "{{ hostvars['westminster'].ansible_host }}"

  - name: Check if DC is in a domain; if not, add to parent domain; if yes, skip
    win_shell: (Get-WmiObject -Class Win32_ComputerSystem).PartOfDomain
    register: is_in_domain

  - name: Add to parent domain
    win_domain_membership:
      dns_domain_name: hacklab.local
      domain_admin_user: [email protected]
      domain_admin_password: Passw0rd!
      state: domain
    when: is_in_domain.stdout == "False"
    register: add_dc_to_domain

  - name: Reboot if adding to domain requires it
    win_reboot:
    when: (add_dc_to_domain.reboot_required is defined) and (add_dc_to_domain.reboot_required)

  - name: Create child domain
    win_shell: |
      $is_in_parent_domain = ((Get-WmiObject -Class Win32_ComputerSystem).Domain) -eq "hacklab.local"
      $is_in_no_domain = (!(Get-WmiObject -Class Win32_ComputerSystem).PartOfDomain)
      if ($is_in_parent_domain -Or $is_in_no_domain) {
        $userName = '[email protected]'
        $password = 'Passw0rd!'
        $pwdSecureString = ConvertTo-SecureString -Force -AsPlainText $password
        $credential = New-Object -TypeName System.Management.Automation.PSCredential-ArgumentList $userName, $pwdSecureString
        Install-ADDSDomain -NewDomainName "senedd" -ParentDomainName "hacklab.local" -InstallDns -CreateDnsDelegation -DomainMode Win2012R2 -ReplicationSourceDC "dc-westminster.hacklab.local" -DatabasePath "C:\Windows\NTDS" -SysvolPath "C:\Windows\SYSVOL" -LogPath "C:\Windows\NTDS" -SafeModeAdministratorPassword (ConvertTo-SecureString -AsPlainText "Passw0rd" -Force) -Force -Credential $credential
      }
    register: create_child_domain
    changed_when: create_child_domain.stdout != ""

  - name: Reboot if created new domain
    win_reboot:
    when: create_child_domain.changed

  - name: Add DA user
    win_domain_user:
      name: sd.da
      state: present
      password: Passw0rd!
      update_password: on_create
      groups:
      - Domain Admins

- hosts: holyrood

  tasks:
  - name: Create domain
    any_errors_fatal: true
    win_domain:
      create_dns_delegation: no
      database_path: C:\Windows\NTDS
      dns_domain_name: indyref2021.local
      domain_netbios_name: indyref2021
      forest_mode: Win2012R2
      install_dns: yes
      log_path: C:\Windows\NTDS
      safe_mode_password: Passw0rd!
      sysvol_path: C:\Windows\SYSVOL
    register: domain_creation

  - name: Reboot for domain creation
    win_reboot:
    when: domain_creation.reboot_required

  - name: Add DA user
    win_domain_user:
      name: brosnachadh.bhruis
      state: present
      password: Passw0rd!
      update_password: on_create
      groups:
      - Domain Admins

  - name: Add DNS forwarder for Westminster domain
    win_shell: |
      if ((Get-DnsServerZone | Where-Object  {$_.ZoneName -eq "hacklab.local"}) -eq $Null) {
        Add-DnsServerConditionalForwarderZone -Name "hacklab.local" -ReplicationScope Forest -MasterServers "{{ hostvars['westminster'].ansible_host }}"
      }
    register: add_westminster_dns_forwarder
    changed_when: add_westminster_dns_forwarder.stdout != ""

- hosts: westminster

  tasks:
  - name: Add DNS forwarder for Holyrood domain
    win_shell: |
      if ((Get-DnsServerZone | Where-Object  {$_.ZoneName -eq "indyref2021.local"}) -eq $Null) {
        Add-DnsServerConditionalForwarderZone -Name "indyref2021.local" -ReplicationScope Forest -MasterServers "{{ hostvars['holyrood'].ansible_host }}"
      }
    register: add_holyrood_dns_forwarder
    changed_when: add_holyrood_dns_forwarder.stdout != ""

  - name: Add domain trust to holyrood
    win_shell: |
      $local_forest = [System.DirectoryServices.ActiveDirectory.Forest]::getCurrentForest()
      if (($local_forest.GetAllTrustRelationships() | Select-Object -ExpandProperty TargetName) -eq $Null) {
        $remote_forest_domain = "indyref2021.local"
        $remote_forest_enterprise_admin = "brosnachadh.bhruis"
        $remote_forest_password = "Passw0rd!"
        $remote_forest_context = New-Object System.DirectoryServices.ActiveDirectory.DirectoryContext(
          "Forest", $remote_forest_domain, $remote_forest_enterprise_admin, $remote_forest_password
        )
        $remote_forest = [System.DirectoryServices.ActiveDirectory.Forest]::getForest($remote_forest_context)
        $local_forest.CreateTrustRelationship($remote_forest, "Inbound")
      }
    register: add_domain_trust
    changed_when: add_domain_trust.stdout != ""
The playbook is self-explanatory for the most part. We're preparing all the hosts with the necessary tools and modules to build the domains. Then, we're building the Westminster forest and Senedd child domain, after which we build the Holyrood forest. Lastly, we establish the inbound domain trust from the Westminster forest to the Holyrood forest.
With the hosts deployed and provisioned, we can step through the stages of compromise outlined in @spotheplanet's post. You may notice that their post targets an additional user that isn't present in the environment provisioned by our playbook. For this post, I've focused on deploying the domains and trust. The next blog, coming very soon, will introduce a second playbook to add some targets to the estate. In fact, we're going to be adding targets in a randomised and somewhat obfuscated fashion to introduce a bit of challenge to the practice, so stay tuned! Wouldn't that be nice... this bit was written when I had a lot more time and motivation to write about orchestration. If there's enough interest, I'll do this.
Troubleshooting, problem solving, bug squishing, addendums, and errata
If you're having any kind of issues with the playbooks, Ansible set-up, Vagrant configs, or anything else, try turning it off and on again. I'm happy to give you a hand but I'm not on Twitter and I'm generally allergic to social media! Try pinging @ZephrFish and tell him I'm ruining your life. If you get on absolutely problem free, I would love to hear about that too.
And a huge shout out, of course, to @myexploit2600 for writing a brilliant set-up guide for the AD hacklab and for continuing to share his expertise so freely. And a massive thank you to @ZephrFish for his continued work on Paving The Way To DA and for letting me post this perishingly long out of date blog on his website.
